
Desserts
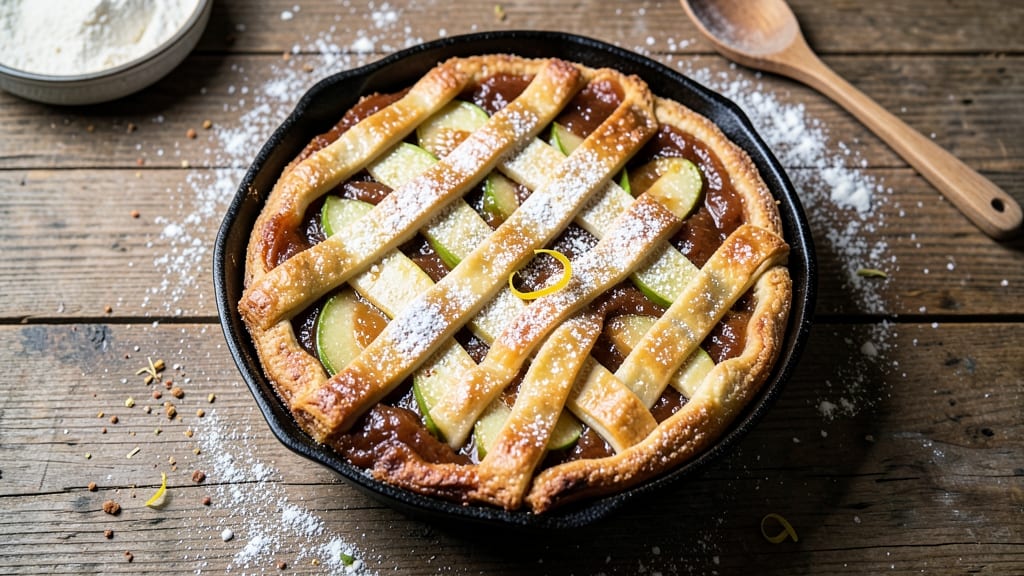
This Amish apple butter pie recipe delivers the perfect balance of warm cinnamon, caramelized apples, and rich apple butter filling—just like Grandma used to make. The secret lies in slow-cooked apple butter that thickens into a velvety spread, while a classic lattice crust adds that rustic charm.
I’ve perfected this recipe over years of baking, ensuring the filling stays thick and the crust remains flaky, even when sliced.
What sets this pie apart is the traditional Amish technique of layering spiced apple butter between tender apple slices, creating a filling that’s both sweet and subtly tangy.
You can use a homemade crust for that authentic touch or opt for a store-bought one to save time—either way, the result is a pie that tastes like comfort. The lattice crust not only looks beautiful but also keeps the filling moist while allowing for that perfect golden-brown finish.
Baking at 375°F for 45–55 minutes ensures the crust is golden and the filling is bubbling but still thick enough to hold its shape. Serve it warm with a scoop of vanilla ice cream or a dollop of whipped cream, and you’ll have a pie that’s impossible to resist.
The aroma alone will have everyone gathering around the table, waiting for their slice.
Whether you’re baking for a family gathering or just craving a taste of nostalgia, this pie is a showstopper. The combination of slow-cooked apple butter and tender apples creates layers of flavor that make every bite worth it. Let’s get baking!
Ingredients for amish apple butter pie
These pantry staples and fresh apples create a pie that tastes like nostalgia in every bite.
| Ingredient | Amount | Notes |
|---|---|---|
| Homemade Apple Butter 🍎 | 1 ½ cups | Slow-cooked, thick consistency |
| Granny Smith Apples 🍏 | 6 medium | Peeled, sliced 1/4-inch thick |
| All-Purpose Flour 🌾 | 3 cups | For pie crust (or use store-bought) |
| Unsalted Butter 🧈 | 1 cup | Cold, cubed for crust |
| Granulated Sugar 🍚 | 1 ½ cups | Plus 2 tbsp for sprinkling |
| Brown Sugar 🍚 | ½ cup | Packed, for crust |
| Ground Cinnamon 🍃 | 2 tbsp | Plus 1 tsp for filling |
| Salt 🧂 | ½ tsp | Fine sea salt |
| Lemon Juice 🍋 | 1 tbsp | Freshly squeezed |
| Vanilla Extract 🥄 | 1 tsp | Pure vanilla preferred |
| Eggs 🥚 | 1 large | For egg wash |
| Heavy Cream 🥛 | ¼ cup | Optional for lattice |
The apple butter is the heart of this pie—homemade is best, but store-bought thick varieties work too. For the apples, Granny Smiths add that tangy balance, but Honeycrisp or Fuji work just as well. The lattice crust is traditional, but you can do a full crust if you prefer. I always grab my flour from King Arthur—it’s got that perfect texture for pie crusts. If you’re making a homemade crust, chill the dough for at least 2 hours before rolling.
No apple butter? Slow-cooked applesauce with cinnamon is a decent swap, but it won’t have that same rich depth. Running short on Granny Smiths? Mix in a few Golden Delicious for sweetness. The cinnamon is non-negotiable—it’s what gives that classic Amish spice profile. If you’re feeling fancy, toast your cinnamon in a dry pan for 30 seconds to deepen the flavor. The lattice crust? Use a knife to cut strips in the dough—no special tool needed. And if you’re really in a rush, Pillsbury pie crust cuts corners without sacrificing too much flavor.
This pie tastes even better the next day, so bake ahead if you can. Store leftovers in an airtight container for up to 4 days in the fridge. The crust stays crispy if you reheat slices in a 350°F oven for 5-10 minutes. Freeze the whole pie (unbaked or baked) for up to 3 months
Why You'll Love This Recipe
- No-Roll Crust Hack: I swear by this shortcut—just mix flour, butter, and ice water until it holds. No chilling, no fuss, and it still flakes like a dream. (Yes, even when my hands are sticky from apple butter.)
- Sweet-Tart Magic: That homemade apple butter? Thick, spiced, and just sweet enough to balance the sharp Granny Smiths. Every bite feels like autumn in a slice—warm, spiced, and impossible to resist.
- Weeknight to Holiday: Use it for breakfast with a scoop of vanilla ice cream or serve it at Thanksgiving when everyone’s too full for pie. Same crust, same filling, endless moments to shine.
- Leftovers That Win: Slice it up and freeze—thawed, it’s perfect for breakfast toast or a quick dessert. And honestly? I’d rather eat this cold pie than most warm ones. (The sugar caramelizes overnight, making it even richer.)
Step-by-step instructions for Amish apple butter pie
Here's how to bake this classic pie with flaky crust and spiced apple butter filling.
Prepare the Pie Crust
In a large bowl, combine the 3 cups all-purpose flour, 0.5 cup packed brown sugar, 2 tbsp ground cinnamon, and 0.5 tsp salt. Cut in the 1 cup cold, cubed unsalted butter using a pastry cutter or your fingers until the mixture resembles coarse crumbs with pea-sized butter pieces remaining.
Gradually add 0.25 cup ice water, 1 tablespoon at a time, mixing gently just until the dough comes together. Avoid overmixing—the dough should hold together when pressed but still feel slightly crumbly. Divide the dough into two equal portions, flatten into discs, wrap in plastic, and refrigerate for at least 1 hour (or up to 2 days).
Assemble the Filling
In a medium bowl, combine the 1.5 cups homemade apple butter, 1.5 cups granulated sugar, 1 tbsp lemon juice, and 1 tsp vanilla extract. Stir until smooth and well blended. Peel and slice the 6 medium Granny Smith apples into 1/4-inch thick slices, then toss them with the apple butter mixture to coat evenly.
This step is where the magic happens—the tartness of the Granny Smith apples balances the sweet apple butter, while the lemon juice brightens everything up. The vanilla extract adds that warm, homey depth that makes this pie taste like a family gathering.
Roll Out and Line the Crust
On a lightly floured surface, roll out one of the chilled dough discs into a 12-inch circle (about 1/8-inch thick). Transfer it to a 9-inch pie dish, gently pressing it into the bottom and up the sides. Trim any excess dough hanging over the edge, leaving about 1/2-inch overhang. Sprinkle 2 tbsp granulated sugar evenly over the bottom crust.
Here's the thing—don't worry if the edges look uneven. The important part is getting that dough into the pie dish evenly. The sugar sprinkle will caramelize during baking, adding extra sweetness and texture to the bottom layer.
Fill and Top the Pie
Carefully arrange the apple slices in a circular pattern in the prepared pie crust, slightly overlapping them as you work. Pour any remaining apple butter mixture over the top, then sprinkle with the additional 1 tsp ground cinnamon. Roll out the second dough disc and cut it into strips for a lattice top, or roll it out to cover the pie completely.
For the lattice, weave the strips over the filling in a crisscross pattern, leaving the center open. Brush the lattice with the 1 lightly beaten egg (mixed with 1 tablespoon water) for a golden finish. If using a solid top crust, cut several slits to allow steam to escape during baking.
Bake to Golden Perfection
Preheat your oven to 375°F. Place the pie on a baking sheet (to catch any drips) and bake for 50-55 minutes, until the crust is golden brown and the filling is bubbling. The edges should be bubbling, and the center should be just set—it'll continue thickening as it cools.
This is where patience pays off. Don't open the oven door during the first 30 minutes of baking—those temperature fluctuations can cause the crust to puff up unevenly. When it's done, let the pie cool completely on a wire rack before slicing. The filling will firm up as it cools, creating that perfect texture between creamy and slightly firm.
Pro Tips For Making Amish Apple Butter Pie
- Preheat the Dough First: I learned this the hard way—rolling out cold pie dough straight from the fridge makes it stubborn and prone to cracking. Press the chilled dough into your pan, then pop it in the oven (with pie weights or dried beans) for 10 minutes at 375°F before filling. This pre-bake creates a sturdy base that won’t shrink or leak when the apple butter melts.
- Slice Granny Smiths Thin: Thick apple slices won’t soften evenly, leaving you with a pie that’s more crunch than custard. Aim for ¼-inch slices—just under the skin—and toss them with 1 tablespoon of sugar and a pinch of cinnamon before layering. This keeps them tender without turning to mush, especially when paired with the thick apple butter.
- Don’t Overmix the Filling: Stirring the apple butter and Granny Smiths too vigorously introduces air, which can make the pie filling bubble over during baking. Gently fold everything together with a spatula—just until the sugar dissolves and the spices are distributed. Overmixing is how you end up with a lumpy, uneven top instead of a smooth, golden crust.
- Use Cold Butter for Lattice: Cutting the unsalted butter into tiny cubes (pea-sized) and chilling them for 20 minutes before weaving the lattice makes all the difference. Warm butter spreads too fast, turning your intricate design into a sad, greasy mess. Work quickly but deliberately—this isn’t the step to rush, even if you’re impatient like me.
Common mistakes when making this recipe
Overfilling the Pie
One of the most common mistakes is overfilling the pie with too many apple slices. The filling should sit about ½ inch below the crust’s edge—any higher and it’ll spill over during baking, creating a messy crust.
I’ve seen pies where the filling nearly reached the top, and the result? A soggy bottom crust and a sticky lattice. 🍎
Skipping the Chill
Never skip chilling the pie dough before rolling it out! Cold dough prevents shrinking and ensures a flaky texture. I once forgot to chill mine and ended up with a tough, dense crust.
Always refrigerate the dough for at least 1 hour—or better yet, overnight. The extra time is worth it for that perfect crust.
Underestimating Baking Time
Pulling the pie out too early is a big no-no. The filling needs time to thicken and set properly. I’ve seen pies taken out at 40 minutes with runny filling that never held its shape.
Bake until the crust is golden brown and the filling bubbles at the edges—usually 50-55 minutes at 375°F. Patience here makes all the difference!
Ignoring the Lattice
A lattice isn’t just decorative—it’s functional! A solid top crust can trap steam, leading to a soggy filling. The lattice allows air circulation while keeping the filling moist.
If you’re new to lattice, use a knife to cut strips in the dough—no special tool needed. Trust me, the texture and appearance are worth the effort. ✨
Overmixing the Dough
Overworking the pie dough develops gluten, resulting in a tough crust. Mix just until the dough comes together—it should still feel slightly crumbly. I’ve seen home bakers knead dough like bread, and the result?
A dense, chewy crust that’s far from flaky. Handle the dough gently, and you’ll get that perfect buttery texture.
Not Preheating the Oven
A cold oven can cause the crust to puff unevenly or even collapse. Always preheat your oven to 375°F for at least 15 minutes before baking. I’ve had pies where the crust didn’t brown evenly because the oven wasn’t hot enough.
A properly preheated oven ensures a golden, even bake every time. 🔥
Nutrition facts
Frequently asked questions
Can I use store-bought apple butter instead of homemade?
Store-bought apple butter works perfectly as long as it's thick and chunky—not runny. Look for brands without added sugar or preservatives for the best flavor. Thin apple butter will make your filling too watery, so if needed, simmer it for 5-10 minutes to thicken it up. The key is consistency—it should coat the back of a spoon.
What's the best way to make the lattice crust look perfect?
Start by rolling out your second dough disc to 12-inch diameter. Use a sharp knife to cut strips about ½-inch wide, then weave them in a crisscross pattern over the filling. Pro tip: Brush the strips with a little milk or egg wash before weaving to help them stick together. If the strips don't lay flat, gently press them down with your fingers—don't worry about perfection, rustic looks delicious too!
How do I prevent the bottom crust from getting soggy?
There are two key tricks: blind bake the bottom crust for 5-7 minutes before adding filling, and sprinkle 2 tbsp sugar on the bottom crust before filling. The sugar caramelizes slightly, creating a barrier between the crust and filling. Also, make sure your filling sits about ½ inch below the crust edge—overfilling is the #1 cause of soggy bottoms!
Can I make this pie ahead of time?
This pie actually tastes better the next day! Bake it a day ahead and store it at room temperature in an airtight container. For longer storage, refrigerate for up to 4 days or freeze the whole pie (baked or unbaked) for up to 3 months. Thaw overnight in the fridge—never at room temperature. The filling will firm up beautifully as it cools, making slicing easier.
What's the secret to that perfect Amish spice flavor?
The magic comes from the combination of cinnamon and vanilla, but don't forget the lemon juice! The acidity balances the sweetness while brightening all the flavors. For extra depth, toast your cinnamon in a dry pan for 30 seconds before using—it intensifies the aroma. A pinch of nutmeg in the filling also adds that classic Amish warmth without overpowering.