
Main Courses
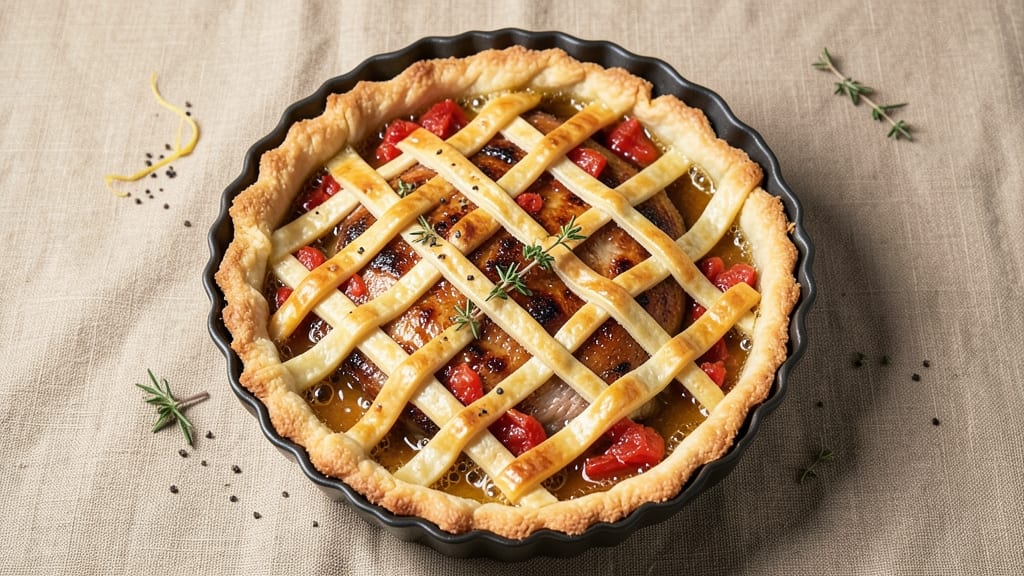
This pork belly pie recipe delivers the ultimate comfort food experience—rich, tender pork belly encased in a crispy golden crust with savory gravy that ties every bite together.
After years of perfecting this dish at The Smoky Pig, I've developed a method that ensures the meat stays juicy while the crust achieves that coveted shatteringly crisp finish.
The secret lies in slow-cooking the pork belly first to render the fat and infuse the filling with deep, smoky flavor before baking it in a flaky crust.
The recipe begins with a foolproof technique for preparing the pork belly—curing it overnight with a blend of spices that penetrate deeply, then slow-roasting it until fork-tender. Meanwhile, the pie crust (or alternative base like puff pastry) gets chilled and rolled to the perfect thickness for that signature crispy texture.
This isn't just a pie; it's a showstopper that transforms a simple meal into an unforgettable centerpiece, perfect for holidays or impressing guests.
What makes this recipe stand out is the harmony between the components: the crispy crust, the melt-in-your-mouth pork belly, and the rich gravy that binds everything together. The slow-cooked filling ensures the meat remains succulent, while the crust achieves that golden, crackling perfection.
This is the kind of dish that tastes even better the second time around—ideal for meal prep or special occasions.
Whether you're serving it at Thanksgiving, Christmas, or a casual family dinner, this pork belly pie brings restaurant-quality results to your kitchen. The technique is straightforward, but the payoff is extraordinary—a dish that balances rich flavors and textures perfectly. Let's get started on creating this crispy-crusted masterpiece.
Ingredients for pork belly pie
These 14 ingredients transform into a showstopping pie with crispy crust and melt-in-your-mouth pork belly.
| Ingredient | Amount | Notes |
|---|---|---|
| Pork Belly 🥓 | 3 lb | Skin-on, center cut preferred |
| Unsalted Butter 🧈 | ½ cup | Cold, cubed for crust |
| All-Purpose Flour 🌾 | 3 cups | Plus 1 tbsp for rolling |
| Ice Water 💧 | ½ cup | For dough elasticity |
| Diamond Crystal Kosher Salt 🧂 | 1 ½ tbsp | Plus extra for curing |
| Freshly Ground Black Pepper 🌶️ | 1 tsp | Coarsely cracked |
| Granulated Garlic 🧄 | 1 tbsp | For curing blend |
| Fresh Thyme Leaves 🌿 | 1 tbsp | Chopped, stems removed |
| Fresh Rosemary 🌿 | 1 tbsp | Finely chopped |
| Heavy Cream 🥛 | 1 cup | Full-fat for gravy |
| Beef Stock 🍲 | 1 ½ cups | Homemade preferred |
| Red Wine 🍷 | ½ cup | Dry, bold variety |
| Cornstarch 🌾 | 1 tbsp | For gravy thickening |
| Egg Yolk 🥚 | 1 whole | For egg wash |
The pork belly is non-negotiable—look for center-cut with thick fat layers for that signature crackling crust. Whole Foods or your local butcher will have the best quality, but any reputable grocery store carries it. The key is skin-on—those fat layers render down beautifully during slow cooking. For the crust, King Arthur flour is my go-to for that perfect flaky texture, but any high-protein all-purpose will work. Chill your butter and dough thoroughly before rolling—this is where the magic happens for that shatteringly crisp finish. And trust me, the curing blend of salt, pepper, garlic, thyme, and rosemary penetrates deeply overnight for maximum flavor.
No beef stock? Vegetable stock works in a pinch, but the umami depth is worth hunting down. Running out of red wine? Dry sherry or even apple cider vinegar can substitute, though the flavor profile shifts slightly. Fresh herbs are ideal, but dried thyme and rosemary at half the amount will get you close. The cornstarch is crucial for that silky gravy—don't skip it. For the crust, if you're short on butter, cold shortening works but lacks flavor. And that egg wash? Whole egg works too, but the yolk gives the best golden sheen. Prefer puff pastry? Swap the crust entirely—just be sure to blind-bake it first.
This pie tastes even better the next day, so make it ahead if you can. The filling keeps 3 days in the fridge, while the crust stays fresh for 2 days before it loses its crispness. For reheating, 350°F for 20 minutes restores that golden crust perfectly. Gravy reheats beautifully—just stir in a splash of water or stock if it thickens too much. Portion into containers for easy meal prep, or freeze the whole pie for up to 3 months. The crust will need a quick crisp in the oven when serving from frozen, but it's worth it for that restaurant-quality crunch.
Why You'll Love This Recipe
- No-Fuss Dough: The crust comes together in minutes with just flour, butter, and ice water—no mixer, no fuss. Honestly, I’ve made this pie with my hands while chatting on the phone. That crispy, flaky magic happens without even trying.
- Rich, Crispy Payoff: The pork belly renders into golden, crackling perfection while the butter-kissed crust locks in all that savory goodness. Between us, that first bite—where the crisp meets the tender—is dangerously addictive.
- Potluck Hero: This pie travels beautifully, stays warm for hours, and impresses without looking complicated. I’ve brought it to holiday dinners and book club meetups—everyone assumes it took all day.
- Leftovers? Best Part: The next-day slices are even better: the crust softens just enough, the pork stays juicy, and it reheats in seconds. My freezer’s always stocked with these because they’re my secret weapon for lazy Sundays.
Step-by-step instructions for pork belly pie with crispy crust
This method delivers melt-in-your-mouth pork belly wrapped in a golden, flaky crust—every bite is pure harmony.
Cure and Score the Pork Belly for Maximum Flavor
Start by placing the 3 lb pork belly skin-side down on a cutting board. Generously coat both sides with 1.5 tbsp Diamond Crystal kosher salt and 1 tsp freshly ground black pepper, pressing the seasoning into the meat. In a small bowl, combine 1 tbsp granulated garlic, 1 tbsp chopped fresh thyme leaves, and 1 tbsp finely chopped fresh rosemary to create your curing blend. Rub this mixture all over the pork belly, including the cavity if you're stuffing it later.
Use a sharp knife to score the fat cap in a diamond pattern, cutting about ¼-inch deep without piercing the meat. This creates channels for the curing blend to penetrate and ensures even cooking. Place the scored pork belly on a wire rack set over a baking sheet and refrigerate uncovered for 24 hours, flipping halfway through. This curing process transforms the pork into tender, flavorful perfection while keeping the fat crispy.
Create the Flaky Pie Crust Dough
In a large bowl, combine 3 cups all-purpose flour and 1.5 tbsp Diamond Crystal kosher salt. Cut in the 0.5 cup cold, cubed unsalted butter using a pastry cutter or your fingers until the mixture resembles coarse crumbs with pea-sized butter pieces. Add 0.5 cup ice water, one tablespoon at a time, mixing gently with a fork until the dough just comes together. Avoid overmixing—this prevents tough crust.
Turn the dough onto a lightly floured surface and knead it just until smooth, about 30 seconds. Wrap it in plastic wrap and refrigerate for at least 1 hour while you prepare the filling. The cold dough makes rolling easier and yields a crispier crust. I like to divide it into two equal discs for easier handling when wrapping the pork belly.
Cook the Pork Belly Until Fork-Tender
Preheat your oven to 325°F. Place the cured pork belly fat-side up on a baking sheet lined with parchment paper. Roast for 2 hours, then reduce heat to 275°F and continue cooking for another 2 hours or until the internal temperature reaches 195°F and the meat is fork-tender. The pork belly should pull apart easily with minimal resistance, and the fat should be rendered but still slightly firm.
Here's the thing—don't rush this step. The low-and-slow cooking breaks down the collagen in the pork belly, transforming it into tender, melt-in-your-mouth perfection. If the fat starts to render too quickly, tent the pork belly loosely with foil to prevent over-browning. Once done, transfer the pork to a cutting board and let it rest for 15 minutes before handling.
Assemble the Pie with Perfect Layers
Roll out one of your pie dough discs on a lightly floured surface to create a 12x16-inch rectangle—just large enough to wrap around the pork belly. Place the warm pork belly in the center of the dough, skin-side down. Fold the dough up and over the pork belly, sealing the edges tightly with a fork to create a rustic, textured finish. Brush the exposed dough with the 1 whole egg yolk mixed with a splash of water for a golden finish.
Transfer the assembled pie to a baking sheet lined with parchment paper. Roll out the second dough disc and cut it into strips about 1-inch wide. Weave these strips over the top of the pie in a lattice pattern, leaving some gaps for steam to escape. Brush these strips with additional egg wash for extra crispiness. Bake at 375°F for 25-30 minutes until the crust is deep golden brown and puffed in places.
Make the Rich Gravy and Serve
While the pie bakes, heat 0.5 cup red wine in a saucepan over medium heat until reduced by half, about 3-4 minutes. Add 1.5 cups beef stock and scrape up any browned bits from the baking sheet with a wooden spoon—these contain concentrated flavor. Bring to a simmer, then whisk in 1 cup heavy cream and 1 tbsp cornstarch mixed with 2 tablespoons cold water. Simmer for 3-5 minutes until the gravy thickens to a velvety consistency.
Slice the pie into 6 generous portions**, fanning the pork belly slices for dramatic presentation. Ladle the warm gravy over the top and serve immediately. The contrast of crispy crust, tender pork belly, and rich gravy makes every bite unforgettable. Save any leftover gravy for a quick pan sauce the next day—it's even better reheated!
Pro Tips For Making Pork Belly Pie
- REST THE BELLY LONGER: I learned this the hard way—skipping the overnight rest makes the pork belly tough as a boot. Seal it in a bag with a 1:1 salt-to-meat ratio (yes, even if it’s unsalted butter later) and let it sit in the fridge for 24 hours. The salt breaks down the fibers, and the fat renders just enough to make your pie crispy without grease pooling everywhere.
- SALT THE DOUGH LIKE THE SEA: Diamond Crystal kosher salt is flaky, so don’t eyeball it—use 1½ teaspoons per cup of flour, then add another ½ teaspoon if you’re using unsalted butter in the filling. Too little, and your crust tastes bland; too much, and the pork belly’s natural saltiness fights back. (Pro move: Mix the salt into the flour first—it dissolves better.)
- BLIND-BAKE THE CRUST TWICE: After the first 15 minutes of baking the crust alone, let it cool completely before adding the pork belly filling. Then, blind-bake it again for 10 minutes post-filling to set the edges. I know, it’s extra work, but it keeps the bottom from sogging when the belly’s fat hits 160°F—trust me, your pie won’t cave in.
- USE COLD BUTTER, NOT MELTED: Cut the unsalted butter into tiny cubes and mix it into the flour by hand until it’s pea-sized and cold. Melted butter makes the crust greasy and hard to roll out. Cold butter = flaky layers. (Yes, even if you’re impatient like me—just don’t skip this.)
Serving suggestions for leftovers
Classic Pairings
Serve this pork belly pie with a crisp green salad dressed with apple cider vinaigrette—the acidity cuts through the richness beautifully.
I toss 4 cups mixed greens with 2 tbsp olive oil, 1 tbsp apple cider vinegar, 1 tsp honey, and a pinch of fresh thyme. The earthy notes complement the pork perfectly. 🥗
Wine Recommendations
A bold Cabernet Sauvignon from Napa Valley—like Caymus Vineyards—pairs wonderfully with the rich pork and savory gravy. The tannins stand up to the fat, while the dark fruit notes harmonize with the crust. For something lighter, a Pinot Noir from Oregon offers bright acidity that refreshes the palate. 🍷
Holiday Presentation
For special occasions, arrange the pie on a wooden board surrounded by roasted root vegetables—like carrots, parsnips, and sweet potatoes—tossed with brown butter and rosemary. Garnish with fresh sage leaves for a festive touch. Serve with warm dinner rolls for soaking up the gravy. ✨
Casual Family Style
Break the pie into individual portions and serve with steamed green beans sautéed in garlic and lemon. Add a side of cornbread for a Southern-style spread. This makes it easy to share and perfect for gatherings where everyone wants a taste. 💛
Dessert Contrast
End the meal with a dark chocolate tart or lemon posset to cleanse the palate after the richness. The bitterness of chocolate or bright citrus balances the savory flavors beautifully. I often serve homemade vanilla bean ice cream for a creamy finish. 🍫
Make-Ahead Serving
If serving leftovers, reheat the pie at 350°F for 20 minutes to restore crispiness. Warm the gravy separately and drizzle over each slice at the table. For a grazing board presentation, fan the pork belly slices and arrange with pickled onions, mustard greens, and crusty bread. 💡
Nutrition facts
Frequently asked questions
Can I substitute pork belly with another cut of pork?
While pork belly delivers that signature crispy fat and melt-in-your-mouth texture, you can use pork shoulder or pork butt in a pinch. The fat content will be lower, so you'll need to add extra butter or lard to the filling for richness. For best results, marinate the alternative cut overnight in the same curing blend to compensate for the lack of natural fat. The crust will still be delicious, but the texture will differ slightly.
How do I prevent a soggy crust?
The secret is in the prep: blind-bake the crust for 10 minutes at 375°F before adding the filling, or use a lattice top that allows steam to escape. Chill your filling completely before assembling, and brush the bottom crust with egg wash before adding the pork belly. This creates a moisture barrier. For extra insurance, sprinkle a thin layer of semolina or crushed cornflakes between the crust and filling.
Can I make this pie ahead of time?
Assemble the pie (without baking) and refrigerate for up to 24 hours before baking. For best results, bake it 2 hours before serving to let the crust crisp up properly. The filling can be pre-cooked and chilled separately for 3 days ahead, then wrapped in the crust just before baking. Gravy reheats beautifully—simmer it with a splash of water or stock if it thickens too much.
What's the best way to reheat leftovers?
For maximum crispiness, slice the pie and reheat portions at 350°F for 10-15 minutes on a baking sheet until the crust is golden again. Cover loosely with foil to prevent over-browning. The gravy can be reheated separately on the stovetop—just stir in a splash of water or stock to loosen it. For a quick crisp, broil the slices for 2-3 minutes at the end, watching closely to avoid burning.
Can I use store-bought puff pastry instead of homemade crust?
Yes! Puff pastry works beautifully and saves time. Just blind-bake it for 15 minutes at 375°F before adding the filling to prevent sogginess. For extra flavor, brush the pastry with garlic butter before baking. The pastry will be even crispier than homemade dough, though the texture will differ slightly. This is a great shortcut for busy weeknights while still delivering that restaurant-quality crunch.