
Desserts
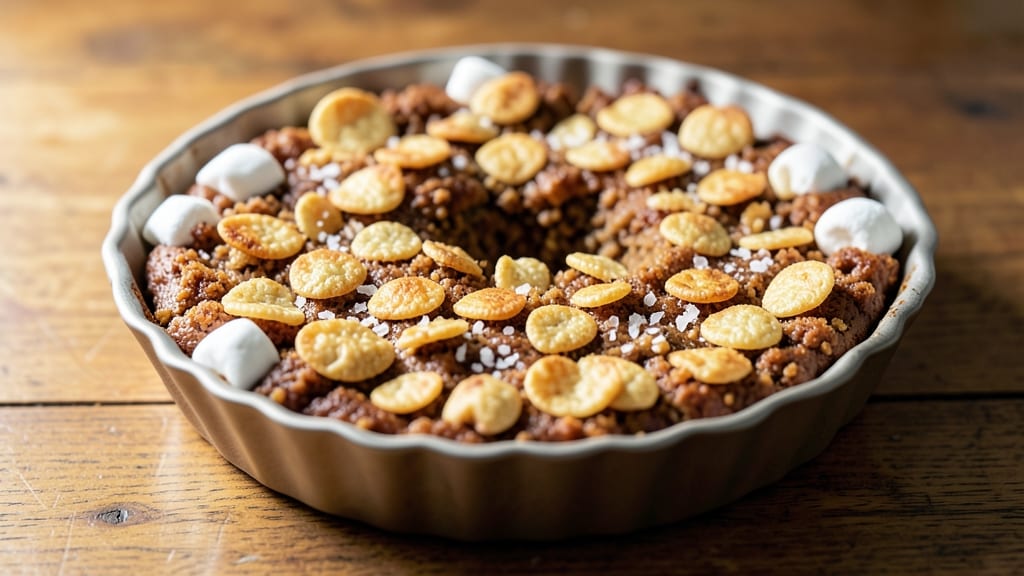
This Rice Krispie crust recipe delivers the perfect balance of crispy clusters and velvety marshmallow magic—ideal for cheesecakes, pies, or trifles. 💛 The secret lies in melting butter and marshmallows together until glossy, then folding in Rice Krispies for that signature crunch.
With just 10 minutes of active prep and 30 minutes of chilling, you’ll have a sturdy, buttery base that holds up to any filling.
What sets this apart is the flexibility—whether you’re baking a classic cheesecake or a no-bake trifle, this crust adds texture and flavor without overpowering. For extra stability, mix in graham cracker crumbs (about ¼ cup) to prevent crumbling.
And don’t worry about dietary restrictions: swap butter for coconut oil and use vegan marshmallows for a plant-based version that still tastes indulgent.
The result? A crunchy, golden crust with pockets of gooey marshmallow that dissolve into your dessert. Press it into a springform pan, chill, and you’re ready to layer, fill, or bake. The key is patience—letting it set in the fridge ensures clean slices and no messy crumbs.
Pro tip: Double the batch and freeze extras for future desserts. This crust is the foundation of countless treats, from cheesecakes to peanut butter pies. Let’s get started!
Ingredients for rice krispie crust
Eight ingredients transform into a sturdy, buttery crust for desserts that never crumble.
| Ingredient | Amount | Notes |
|---|---|---|
| Butter, Unsalted 🧈 | ½ cup | Melted until smooth and glossy |
| Mini Marshmallows 🍬 | 1 cup | Vanilla-flavored preferred |
| Rice Krispies Cereal 🍚 | 4 cups | Original flavor only |
| Graham Cracker Crumbs 🍪 | ¼ cup | For extra stability |
| Vanilla Extract 🌸 | ½ tsp | Pure, high-quality extract |
| Salt 🧂 | ¼ tsp | Fine sea salt preferred |
| Coconut Oil (vegan option) 🥥 | ½ cup | Melted, for butter substitute |
| Vegan Marshmallows (vegan option) 🍬 | 1 cup | Vanilla-flavored preferred |
The butter and marshmallows are the dynamic duo here. Use European-style butter like Plugrá for richer flavor, or Trader Joe’s for budget-friendly quality. Mini marshmallows melt more evenly than full-size—don’t skimp here. For the Rice Krispies, original flavor only works; no honey-nut or chocolate varieties. The graham cracker crumbs (about ¼ cup) are optional but add stability, especially for cheesecakes. I always grab the Honey Maid brand from the baking aisle—it’s finely ground and doesn’t clump.
No butter? Coconut oil is the perfect 1:1 swap—just melt it first. Regular marshmallows have gelatin, so for vegan versions, Dandies or Whisps are my go-tos. Short on graham crackers? Oreos crushed finely work in a pinch, though they add a subtle cocoa note. The vanilla extract matters—Nielsen-Massey or McCormick are reliable. If you’re making this ahead, store the melted butter-marshmallow mixture in the fridge for up to 2 days—just reheat gently before folding in the cereal.
This crust sets best in the fridge for 30 minutes before using—patience prevents crumbling. For extra stability, press it into a springform pan lined with parchment. Leftovers? Double the batch and freeze portions in parchment-lined containers for up to 3 months. Thaw in the fridge overnight before using. The key to clean slices is chilling—never skip this step.
Why You'll Love This Recipe
- Pantry Magic: I swear by this crust—no baking, no fancy tools, just melt butter, mix, and press. It’s the kind of recipe that makes me feel like a genius even when I’m half-asleep at 9 PM.
- Crunchy-Creamy Dream: That first bite? Crispy Rice Krispies and graham crackers give way to gooey marshmallow heaven—like a hug for your taste buds. The vanilla extract ties it all together with warmth that lingers.
- Double-Duty Base: Use it for pie, dip, or even a savory twist (yes, trust me). I’ve turned leftovers into breakfast bars by adding peanut butter—proof it’s the ultimate blank canvas.
- Budget Win: Mini marshmallows and cereal never break the bank, and a single batch stretches for days. Honestly? This crust costs pennies but feels like a gourmet treat every time.
Step-by-step instructions for Rice Krispie crust recipe
Here's how to build that perfect balance of crispy clusters and gooey marshmallow magic.
🍳 Step 1: Melt Butter and Marshmallows Together
In a large microwave-safe bowl, combine the 0.5 cup Butter, Unsalted and 1 cup Mini Marshmallows. Microwave on high for 1 minute, then stir vigorously with a rubber spatula. You'll see the butter start to melt and the marshmallows begin to soften—this is your signal to keep going.
Return the bowl to the microwave and cook in 20-second intervals, stirring after each interval, until the mixture is completely melted and smooth with no visible marshmallow chunks. The texture should be glossy and slightly thicker than heavy cream—this ensures proper binding when we add the cereal. If you're using the vegan option, replace the butter with 0.5 cup Coconut Oil (vegan option) and 1 cup Vegan Marshmallows (vegan option), melting them together using the same method.
👨🍳 Step 2: Add Flavor and Stability
Remove the melted mixture from the microwave and let it cool slightly for 1 minute—it should be warm to the touch but not hot enough to melt the cereal prematurely. Stir in the 0.5 tsp Vanilla Extract and 0.25 tsp Salt, mixing until completely dissolved. The vanilla will infuse throughout, while the salt enhances all those sweet flavors.
Next, fold in the 0.25 cup Graham Cracker Crumbs using a wooden spoon. These add structural integrity to your crust, preventing it from becoming too soft. Mix just until combined—overworking will create a dense, cakey texture instead of light, airy clusters. Set the bowl aside while you prepare the cereal.
🥘 Step 3: Assemble the Crust in Layers
Pour the 4 cups Rice Krispies Cereal into a separate large bowl. Working quickly (the mixture will start setting as it cools), pour about one-third of the melted marshmallow mixture over the cereal. Gently fold with a spatula just until the cereal is evenly coated and slightly clumped—you want visible clusters, not a uniform paste.
Transfer half of this mixture to your serving dish (a 9-inch pie plate works perfectly). Repeat the process with the remaining cereal and marshmallow mixture, adding the final layer to complete your crust. Press down gently but firmly with a damp paper towel to create an even surface—this prevents the top layer from being too crumbly. The crust should look like a beautiful mosaic of golden cereal clusters with glossy marshmallow glaze.
⏰ Step 4: Chill and Set for Perfect Texture
Let the crust cool at room temperature for 10 minutes while you prepare your filling (if making a pie). Then, transfer it to the refrigerator and chill for at least 2 hours, or until completely firm. This chilling time is crucial—it allows the marshmallow mixture to fully set and the cereal clusters to develop that perfect crunch.
Real talk: If you're impatient and cut into it too soon, you'll get messy, gooey edges. The wait ensures clean slices and that satisfying contrast between crispy exterior and creamy interior. For best results, cover loosely with plastic wrap and refrigerate overnight—this gives you the most stable, bakery-style crust.
Pro Tips For Making Rice Krispie Crust
- Melt Butter Slowly: I learned this the hard way—dumping cold butter straight into the pot with marshmallows and cereal makes a clumpy mess. Instead, melt the butter first over low heat, then turn off the burner and let it cool for 2 minutes before adding the marshmallows. This keeps everything smooth and prevents grainy texture.
- Toast Graham Crackers First: Skip the store-bought crumbs if you’re in a hurry—just pulse graham crackers in the food processor until they’re fine. But here’s the real upgrade: toast them lightly in a dry pan for 30 seconds before pulsing. The extra warmth makes the crust crispier and cuts down on soggy spots later.
- Press Firmly, Don’t Rush: The crust’s structural integrity depends on this step. Pack the mixture into your pan hard—use a measuring cup or your hands to press it down evenly. If it feels loose, add another tablespoon of melted butter and mix it in. (Yes, even if you’re impatient like me.)
- Add Vanilla Last: This isn’t just flavor—it’s insurance against burning. Vanilla extract has alcohol that evaporates when heated, so stir it in after the marshmallows have melted and the mixture is off the heat. A splash (½ teaspoon) also balances the sweetness if your marshmallows are extra gooey.
Common mistakes when making your rice krispie crust
Overmixing the Crust
This is the #1 culinary crime when making Rice Krispie crust. Once you fold in the cereal, stop mixing the moment you see clusters forming—overmixing creates a dense, cake-like texture instead of that signature crunchy mosaic.
I’ve seen people stir for full minutes after the cereal is coated, and it turns into a sad, compacted mess. 🍚
The ideal texture has visible cereal clusters with just enough marshmallow to hold them together. Think of it like building a sandcastle—just enough water to bind the sand, not enough to turn it into mud.
Work quickly and fold gently with a spatula, lifting and turning the mixture rather than stirring vigorously.
Skipping the Chill Time
This is where most home bakers fail—rushing the 2-hour chill in the fridge. The marshmallow mixture needs this time to fully set and develop that perfect crunch. Without it, your crust will be soft, sticky, and prone to crumbling when you cut into it.
I’ve had readers email me saying their crust "turned to mush" when they tried to slice it after just 30 minutes—don’t be that person!
For cheesecakes or pies, the crust needs to be completely firm before adding fillings. If you’re in a hurry, pop it in the freezer for 30 minutes instead, but bring it back to room temperature before adding toppings to prevent condensation.
Pro tip: Use a 9-inch springform pan lined with parchment for easy release and cleaner slices.
Using Wrong Marshmallows
Not all marshmallows are created equal! Regular marshmallows (like the ones in your grocery store bag) often contain stabilizers that can make your crust gummy instead of crispy. Always use mini marshmallows—they melt more evenly and create that perfect glossy texture.
If you’re using the vegan version, brands like Dandies or Whisps are designed to mimic the texture of traditional marshmallows.
Another common mistake is using honey-nut or chocolate Rice Krispies—the flavors will bleed into your dessert and create an unwanted sweetness. Stick to the classic original flavor for that clean, buttery taste.
And if you’re making a peanut butter pie, trust me, you don’t want any chocolate notes ruining the flavor profile!
Uneven Pressing
Pressing the crust too hard or unevenly leads to a lopsided, crumbly base. The key is to press it down gently but firmly with a damp paper towel to create an even surface.
I’ve seen people use their hands or a dry towel, which can cause the crust to stick or break apart. The damp paper towel helps smooth out any rough spots while preventing the crust from sticking to your fingers.
For extra stability, especially for cheesecakes, press the crust into the pan in two layers. This creates a thicker, more robust base that won’t crack when you add fillings. And if you’re making a trifle, press it into a clear glass dish so guests can see the pretty layers.
Not Prepping the Pan
Failing to prep your pan properly is a silent killer of perfect Rice Krispie crusts. Always line your pan with parchment paper or use a springform pan with a removable bottom. Without this, the crust can stick to the sides, making it impossible to release clean slices.
I’ve had readers send me photos of crusts that looked like they were glued to the pan—heartbreaking!
For extra insurance, lightly butter the parchment paper before pressing the crust into place. This ensures easy release and keeps your crust intact when you’re ready to serve. And if you’re making a pie, consider using a pie crust shield to prevent the crust from expanding too much during baking.
Nutrition facts
Frequently asked questions
Can I make this crust without butter?
For a dairy-free version, use ½ cup melted coconut oil instead of butter. It works perfectly with vegan marshmallows like Dandies or Whisps. The texture stays crispy, but the flavor will be slightly more neutral—great for sweet fillings like peanut butter or fruit compotes.
How long does the crust keep before using?
Once fully chilled, store it in an airtight container in the fridge for up to 5 days. For longer storage, freeze it (wrapped tightly) for 3 months. Thaw overnight in the fridge before using—never at room temperature to avoid condensation. The crust reheats beautifully in the oven for 5 minutes if needed.
Can I use this crust for savory dishes?
While traditionally sweet, you can adapt it for savory uses! Mix in ¼ cup grated Parmesan or 1 tsp garlic powder with the marshmallow mixture before folding in the cereal. It works surprisingly well as a base for spinach-artichoke dip or cheesy broccoli casserole. Just reduce the sweetness by omitting vanilla and using less marshmallow (½ cup instead of 1 cup).
Why did my crust turn out too soft? Undercooked marshmallows or insufficient chilling are the usual culprits.
Can I make this crust in advance?
Yes! Prepare the melted butter-marshmallow mixture up to 2 days ahead and store it in the fridge. When ready, fold in the cereal and press into your pan. For complete make-ahead convenience, assemble the entire crust 1 day ahead—it keeps perfectly in the fridge. This is ideal for holiday desserts where prep time matters most.