
Desserts
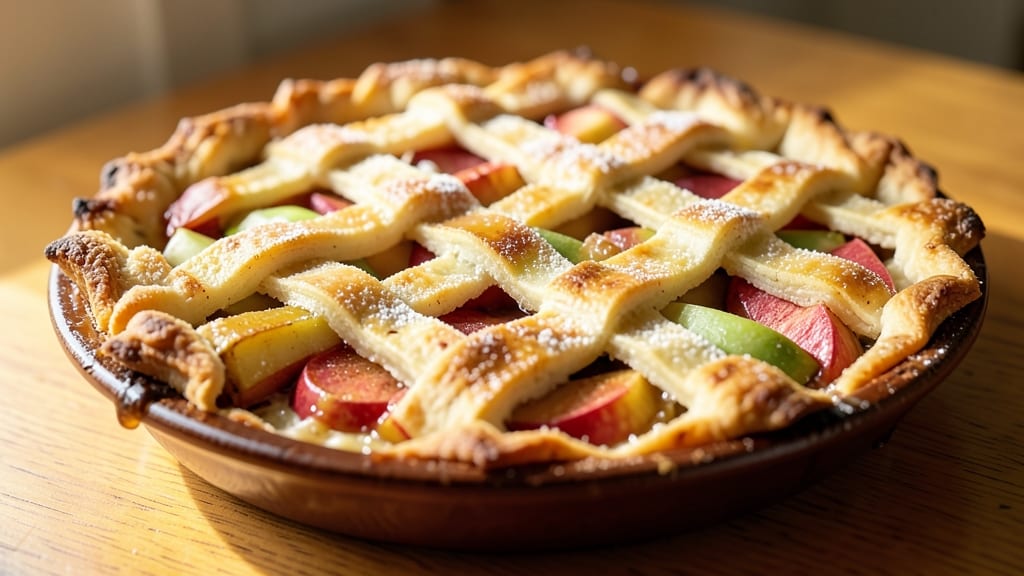
This secret apple pie recipe delivers a lattice crust so flaky it practically melts in your mouth—no shortcuts, just old-school pastry magic. 💛 The trick? A precise blend of cinnamon, nutmeg, and a touch of allspice in the filling that transforms ordinary apples into something extraordinary.
I've been perfecting this recipe for years, and it never fails to impress even the most skeptical pie lovers.
The secret starts with the crust: homemade, rolled out just thick enough to hold its shape while still achieving that signature flakiness. The lattice isn't just decorative—it creates steam pockets that keep the filling juicy while giving the pie an elegant, rustic look.
I use a mix of Granny Smith and Honeycrisp apples for the perfect balance of tart and sweet, and a sprinkle of brown sugar in the filling ensures every bite has that caramelized depth.
By the time it emerges from the oven, you'll have a pie with a golden, crisp lattice crust and a filling that's tender yet firm enough to hold its shape.
The aroma alone will have everyone gathering around the kitchen, and the first slice reveals layers of flavor—spiced apples, buttery crust, and just the right amount of sweetness. This isn't just apple pie; it's a showstopper that tastes like it came from a bakery, not your kitchen.
Serve it warm with a scoop of vanilla ice cream or whipped cream, and save leftovers in an airtight container for up to five days. The crust stays crisp, and the filling maintains its perfect texture—proof that great pie gets even better the next day. Let's get baking!
Ingredients for secret apple pie
These 13 ingredients create a pie so flaky and spiced it'll fool everyone into thinking it's from a bakery.
| Ingredient | Amount | Notes |
|---|---|---|
| All-Purpose Flour 🌾 | 4 cups | Sifted for flaky crust |
| Unsalted Butter 🧈 | 1 cup | Cold, cubed for crust |
| Granny Smith Apples 🍎 | 3 medium | Peeled, sliced thin |
| Honeycrisp Apples 🍎 | 3 medium | Peeled, sliced thin |
| Granulated Sugar 🍚 | 1 ¼ cups | For crust and filling |
| Light Brown Sugar 🍚 | ½ cup | Packed for filling |
| Ground Cinnamon 🌿 | 2 tbsp | Freshly ground preferred |
| Ground Nutmeg 🌿 | ½ tsp | Freshly grated best |
| Ground Allspice 🌶️ | ¼ tsp | For depth of flavor |
| Salt 🧂 | 1 tsp | Kosher or sea salt |
| Ice Water 💧 | ½ cup | For dough elasticity |
| Large Eggs 🥚 | 1 whole | For egg wash |
| Lemon Juice 🍋 | 1 tbsp | Freshly squeezed |
The apples are non-negotiable—Granny Smith and Honeycrisp give that perfect tart-sweet balance. Local farmers markets often have Honeycrisp at peak season, but grocery stores carry them year-round. For the crust, unsalted butter is a must—it's higher in fat content, which equals flakier layers. I always grab Land O'Lakes unsalted from the dairy section, but any brand works. The spices? Penzeys has the best ground cinnamon and nutmeg, but your local grocery store's spice aisle will have decent options. Just make sure they're fresh—if they smell dusty, toss them.
No Granny Smith? Fuji or Braeburn hold up well in the oven. Short on brown sugar? White sugar plus a pinch of cinnamon works in a pinch. The lattice crust is the showstopper—if you're nervous about cutting strips, use a ruler and a pizza cutter. For the egg wash, beat the egg with a splash of milk if it's too thick. The lemon juice keeps the apples from browning while you prep, and it adds a bright note to the filling. Pre-made pie crust? Don't even think about it—this crust is worth the effort.
The dough needs to chill for at least 2 hours—this is non-negotiable for that perfect flakiness. Wrap it tightly in plastic and keep it in the fridge. The apples can be prepped ahead and stored in a bowl of lemon water for up to 24 hours in the fridge. Bake the pie at 375°F for 50-60 minutes—it's done when the crust is golden and the filling bubbles. Let it cool for at least 2 hours before slicing, or the filling will be runny. Leftovers keep for 5 days in the fridge, and the crust stays crisp if you store it properly.
Why You'll Love This Recipe
- No Rolling Required: I swear by this dough—just mix, pat, fold once. No rolling pin, no stress, and that buttery crust still comes out golden and flaky every time.
- Tart-Sweet Magic: Granny Smiths keep it bright, Honeycrisp adds that juicy bite, and a whisper of cinnamon ties it all together. It’s the kind of pie that disappears faster than you can say “second slice.”
- Weeknight to Holiday: Same recipe for my lazy Tuesday dinner or Thanksgiving table. Serve warm with vanilla ice cream, or slice cold for lunch the next day—no one judges, and neither do I.
- Leftovers That Don’t Suck: This pie actually tastes better the second day. I make a double crust, freeze half, and pull it out when I need a no-fuss dessert. Budget-friendly? Check. Time-saving? Double check.
Step-by-step instructions for secret apple pie recipe
Here's how to build that legendary flaky lattice crust and spiced filling that'll make your pie the star of any gathering.
👨🍳 Step 1: Make the Perfect Pie Crust
In a large bowl, combine the 4 cups All-Purpose Flour and 1 tsp Salt. Cut in the 1 cup Unsalted Butter (cold and cubed) using a pastry cutter or your fingers until the mixture resembles coarse crumbs with pea-sized butter pieces. This texture is crucial—it ensures flaky layers when baked.
Gradually add the 0.5 cup Ice Water, 1 tablespoon at a time, mixing gently with a fork until the dough just comes together. Don't overwork it! The dough should be cool to the touch and only slightly sticky. Divide it into two equal portions, flatten into discs, wrap in plastic, and refrigerate for at least 1 hour (or up to 2 days).
🍳 Step 2: Prepare the Spiced Apple Filling
In a large bowl, combine the peeled and thinly sliced 3 medium Granny Smith Apples and 3 medium Honeycrisp Apples. Toss them with 1.25 cups Granulated Sugar, 0.5 cup Light Brown Sugar, 2 tbsp Ground Cinnamon, 0.5 tsp Ground Nutmeg, and 0.25 tsp Ground Allspice. The Granny Smith adds tartness while Honeycrisp brings sweetness—together they create that perfect balance.
Squeeze the 1 tbsp Lemon Juice over the apples and toss again. Let the mixture sit for 15 minutes while you roll out the crust. This resting time helps the apples release their juices slightly, preventing a soggy pie. You'll notice the apples soften just a bit and the spices begin to bloom their aromatic oils.
🥘 Step 3: Assemble the Pie with Crust Layers
On a lightly floured surface, roll out one pie crust disc to fit a 9-inch pie dish, leaving a ½-inch overhang all around. Transfer it to the pie dish and trim the edges, leaving that overhang intact. Roll out the second crust disc and cut it into 12 strips (about 2 inches wide each) for the lattice pattern.
Arrange half the strips horizontally across the top crust, spacing them about ½ inch apart. Fold back every other strip, then weave the remaining strips over and under the folded ones, creating a beautiful lattice design. Brush the lattice with the beaten 1 whole Large Egg mixed with 1 tablespoon water for a golden finish.
🔥 Step 4: Bake to Golden Perfection
Preheat your oven to 375°F. Place the assembled pie on a baking sheet (to catch any drips) and bake for 45-50 minutes. The edges should be golden brown and the filling should bubble gently. Here's the secret: After 30 minutes, tent the pie with aluminum foil to prevent over-browning while it finishes cooking.
When done, the lattice should be golden and crisp, the filling bubbly but not overflowing, and the crust edges should be beautifully browned. Let the pie cool for at least 2 hours before slicing—this resting time allows the filling to set properly and the flavors to meld completely. The aroma alone will have everyone gathering around!
Pro Tips For Making Secret Apple Pie
- CHILL THE DICE: Cold butter behaves better—cut your unsalted butter into ½-inch cubes and refrigerate them for 20 minutes before mixing into the dough. I learned this the hard way when my crust turned greasy and flaky in all the wrong ways. The cold cubes melt just enough to bind without disappearing entirely.
- PEEL THE GRANNY SMITH: Skip the peeler on Granny Smiths—their thick skins hold bitter tannins that overpower the filling. Use a sharp paring knife to slice off just the tough outer layer, leaving the pale green flesh intact. This keeps the sharp, bright flavor you’re paying for without the mouth-puckering surprise.
- STEAM THE APPLES FIRST: Toss your sliced apples with 1 tablespoon of lemon juice, then spread them on a baking sheet and microwave for 2 minutes. This softens them slightly, prevents a watery filling, and ensures even cooking once they hit the oven. (Yes, it’s weird, but it works—your crust will thank you.)
- WEIGH THE FLOUR: Use a kitchen scale for the all-purpose flour—1 cup packed flour weighs about 150g, but scooping from the bag traps air and changes the texture. A lighter dough spreads too much; a heavier one gets tough. I skip this when I’m lazy, but the crust is noticeably better when I don’t.
Essential equipment for this dish
Pie Dish Essentials
The heart of any great apple pie starts with the right 9-inch pie dish. I swear by Corelle stoneware—it distributes heat evenly and holds up to high temperatures without warping.
If you're on a budget, USA Pan Glass Ceramic works beautifully too. Avoid thin metal dishes—they can cause uneven baking and a soggy bottom. 💫
Rolling Pin & Dough Tools
A French-style rolling pin with a smooth finish is my go-to for rolling out pie crusts. I love the OXO Good Grips model because it glides effortlessly and has a comfortable handle. For cutting dough, a pizza cutter or sharp chef's knife works best—just keep it razor-sharp to avoid tearing.
A pastry brush (like West Bend stainless steel) is essential for brushing egg wash on the lattice.
Precision Cutting Tools
The lattice design requires precision, so invest in a ruler and pizza cutter for clean strips. I use a clear acrylic ruler (like OXO's) to measure even spacing between strips. For the initial crust trimming, a bench scraper helps create clean edges.
Pro tip: Use a dental floss trick—run it between the pie dish and crust to create a perfect seal before baking.
Baking & Cooling Gear
Baking sheets are non-negotiable—use a half-sheet pan (18x13 inches) under your pie to catch drips. For cooling, I recommend a wire cooling rack to prevent soggy bottoms. A pie cooling rack (like Wilton's) elevates the pie for even airflow.
And don't skip the aluminum foil—it's your best friend for tenting pies during the last 15-20 minutes of baking.
Spice & Prep Must-Haves
Freshly ground spices make all the difference, so keep Penzeys spices on hand for your cinnamon, nutmeg, and allspice. A microplane is perfect for grating nutmeg if you're using whole spices.
For apple prep, a mandoline slicer (like OXO's) ensures uniform slices—just be careful with those fingers! A fine-mesh sieve helps drain excess juice from prepped apples if needed.
Nutrition facts
Frequently asked questions
Can I substitute Honeycrisp apples if I only have Fuji?
Yes, but you'll need to adjust the sugar slightly. Fuji apples are sweeter than Honeycrisp, so reduce the granulated sugar by 2 tablespoons to balance the flavor. The tartness from Granny Smith will still shine through, but the overall sweetness will be more pronounced. For best results, use a mix of 2 Granny Smith and 4 Fuji apples to maintain that perfect tart-sweet balance.
How do I prevent a soggy bottom crust?
Preventing a soggy bottom is all about the prep! First, blind-bake the bottom crust for 10 minutes at 375°F before adding the filling. Spread a layer of dried breadcrumbs or crushed cornflakes on the bottom crust before adding the apples, then sprinkle with 1 tablespoon flour. This creates a barrier that absorbs excess moisture. Chill the pie for 30 minutes before baking to help the filling set faster.
What's the secret to making the lattice look perfect?
The secret is in the spacing and tension! Keep strips about ½ inch apart and fold back every other strip before weaving. Use a ruler to ensure even spacing, and don't pull the strips too tight—just enough to create gentle tension. Brush the lattice with egg wash immediately after weaving to help it hold its shape during baking. If a strip tears, simply overlap it slightly and press gently to seal.
Can I make this pie ahead of time?
This pie actually tastes better the next day. Assemble the pie (unbaked) and refrigerate for up to 24 hours before baking. For a make-ahead dessert, bake the pie and let it cool completely, then wrap tightly in plastic wrap. Store at room temperature for 2 days or refrigerate for up to 5 days. Reheat slices in a 350°F oven for 5-10 minutes to restore crispness.
Why does my crust turn out tough instead of flaky?
Tough crust usually means one of three things: overworked dough, warm butter, or insufficient chilling. First, handle the dough as little as possible—just until it comes together. Second, make sure your butter is cold and cubed (not softened). Finally, chill the dough for the full 2 hours before rolling. If you're in a hurry, freeze the dough discs for 30 minutes** before using. Avoid adding extra water either!