
Main Courses
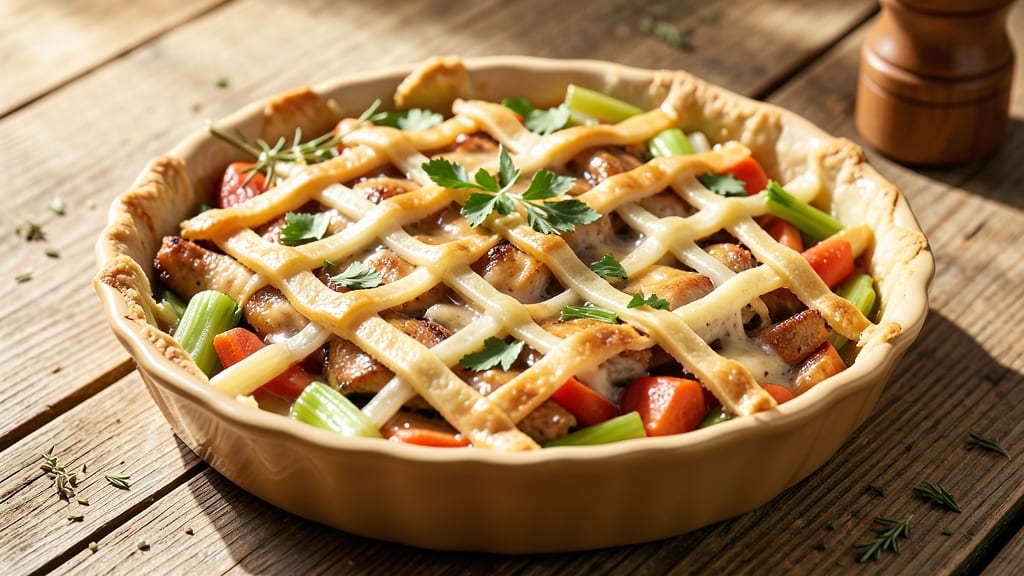
This semi homemade chicken pot pie recipe delivers all the comfort of grandma's classic—creamy, savory filling topped with a foolproof flaky crust—without requiring hours of pie-making.
The secret lies in balancing tender chicken, seasonal vegetables, and a velvety herb-infused gravy, all encased in a shortcut crust that still achieves restaurant-quality flakiness. I've perfected this version to minimize effort while maximizing that satisfying first bite: crispy, golden crust giving way to warm, creamy filling.
The beauty of this approach is its flexibility. You can use store-bought pie crust for convenience while still achieving that flaky texture home cooks crave, or roll out your own dough for extra satisfaction.
The filling comes together in one pot, with chicken simmering until tender and vegetables softening just enough to melt into the creamy sauce. Herbs like thyme and parsley add depth without overpowering, while a touch of mustard brightens the flavors—subtle but essential for that perfect balance.
What makes this recipe truly special is how it satisfies every craving: the creamy gravy clings to each bite of flaky crust, while the tender chicken and vegetables provide hearty substance.
It's the kind of dish that transforms a simple weeknight into a cozy meal, with aromas that fill your kitchen and flavors that linger long after the last bite. The best part?
It's ready in about an hour, with minimal cleanup—ideal for feeding a family or impressing guests without the stress of traditional pie-making.
Whether you're serving it as a comforting family dinner or bringing it to a potluck, this semi-homemade version delivers the same nostalgic satisfaction as the classic, but with modern shortcuts that make it achievable.
The key is in the technique: proper layering, a hot oven for that perfect crust, and a bit of patience to let the filling set while baking. Trust me, the results are worth every minute of effort—and the compliments will be even better.
Ingredients for semi homemade chicken pot pie
Foolproof flaky crust meets velvety gravy—just 15 ingredients for ultimate comfort.
| Ingredient | Amount | Notes |
|---|---|---|
| Boneless Chicken Thighs 🍗 | 1 ½ lb | Trimmed of excess fat |
| All-Purpose Flour 🌾 | 2 cups | For pie crust |
| Unsalted Butter 🧈 | ¾ cup | Cold, cubed for crust |
| Yellow Onion 🧅 | 1 whole | Medium size, diced |
| Carrots 🥕 | 4 medium | Peeled, sliced thin |
| Celery Stalks 🌿 | 2 whole | Diced, about 1 cup |
| Fresh Thyme 🌿 | 1 tbsp | Leaves only, chopped |
| Fresh Parsley 🌿 | ¼ cup | Chopped for garnish |
| Dijon Mustard 🍯 | 1 tbsp | For brightness |
| Heavy Cream 🥛 | 1 cup | Full-fat for richness |
| Chicken Broth 💧 | 1 ½ cups | Low-sodium preferred |
| Salt 🧂 | 1 ½ tsp | Kosher or sea salt |
| Black Pepper 🌶️ | ½ tsp | Freshly ground |
| Ice Water 💧 | ¼ cup | For pie dough |
| Egg 🥚 | 1 whole | For egg wash |
The chicken thighs are non-negotiable here—they stay juicy while the filling simmers. Look for bone-in, skin-on thighs at Whole Foods or your local butcher for extra flavor, but boneless works too. For the crust, King Arthur flour gives the best texture, but any all-purpose works. The butter should be cold enough to hold its shape when pinched—take it out of the fridge 10 minutes before mixing. Fresh thyme and parsley elevate the filling, but dried will work in a pinch (use half the amount).
No Dijon mustard? Yellow mustard at double the amount works, but you'll lose some depth. Short on heavy cream? Half-and-half plus 1 tbsp melted butter mimics the richness. The carrots can be baby carrots if that's what you've got—just peel them first. For a shortcut crust, Pillsbury refrigerated pie crust saves time while still delivering that satisfying flakiness. The egg wash is essential for that golden finish—don't skip it!
This pie reheats beautifully—just cover with foil for the first 10 minutes to prevent over-browning. Keeps for 3-4 days in the fridge, freezes for 3 months. I always make an extra portion to freeze for lazy weeknights. For serving, a sprinkle of fresh parsley adds that restaurant-quality touch. The filling can be prepped ahead and baked fresh—just assemble and bake when ready.
Why You'll Love This Recipe
- One-Pan Magic: I swear by this—just brown the chicken thighs and veggies in the same pan you’ll later bake the pie in. No extra pots, no scrubbing. The onions caramelize right alongside the carrots while you mix the roux, and suddenly, cleanup is just wiping one pan.
- Tender Crisp Perfection: That buttery crust (made with just flour and cold butter) shatters into flakes while the filling stays silky. The chicken thighs stay juicy—no dry, rubbery texture here—because they’re cooked low and slow in the oven, not boiled to oblivion.
- Weeknight to Dinner Party: Honestly, this is my lazy day and my impress-the-guests dish. For weeknights, I use store-bought puff pastry for the crust. For company, I roll out the homemade version—same filling, just fancier edges. (My in-laws still ask for the recipe every time.)
- Leftovers That Taste Better: Between us, my pot pie actually improves the next day. The flavors meld overnight, and reheating it in the oven (just 10 minutes) makes the crust crisp again. I make a double batch on Sundays—lunch one day, dinner the next, and still have enough for a workday soup. Budget-friendly? Absolutely. Worth it? Even more.
Step-by-step instructions for semi homemade chicken pot pie
Here's how to build a restaurant-quality pot pie with a crisp, golden crust and velvety filling.
Prepare the Chicken and Vegetable Filling
In a large Dutch oven, melt 0.5 cup of the unsalted butter over medium-high heat. Add the 1.5 lb boneless chicken thighs, seasoned with 0.75 tsp salt and 0.25 tsp black pepper, and cook for 6-8 minutes per side until golden brown and cooked through. Remove the chicken and set it aside to rest.
In the same pot, add the remaining 0.25 cup unsalted butter and melt over medium heat. Add the diced yellow onion, sliced carrots, and diced celery stalks. Cook for 8-10 minutes until the vegetables soften and the onion becomes translucent. Stir in the fresh thyme and cook for another 1 minute to release its aromatic oils.
Create the Creamy Gravy Base
Pour in the 1.5 cups chicken broth and 1 tbsp Dijon mustard, scraping up any browned bits from the bottom of the pot. Bring the mixture to a gentle simmer and let it cook for 5 minutes to allow the flavors to meld. Stir in the 1 cup heavy cream and the remaining 0.75 tsp salt and 0.25 tsp black pepper.
Return the cooked chicken to the pot and shred it using two forks, breaking it into bite-sized pieces. Let the filling simmer for another 5 minutes to ensure everything is heated through and the flavors are fully integrated. The gravy should be thick and creamy, coating the back of a spoon. If it's too thick, add 1-2 tablespoons of water to reach your desired consistency.
Assemble the Pie Crust
In a large bowl, combine the 2 cups all-purpose flour and 1.5 tsp salt. Cut in the 0.75 cup cold unsalted butter using a pastry cutter or your fingers until the mixture resembles coarse crumbs with pea-sized butter pieces. Sprinkle in the 0.25 cup ice water and mix gently until the dough just comes together. Be careful not to overwork it.
Turn the dough out onto a lightly floured surface and knead it gently for 30 seconds until smooth. Divide the dough into two equal parts and roll each into a 12-inch circle. If the dough feels sticky, chill it in the refrigerator for 10 minutes to firm up before rolling. This ensures a flaky, tender crust.
Layer and Bake the Pot Pie
Preheat your oven to 375°F. Transfer the chicken and vegetable filling to a 9-inch pie dish or deep baking dish. Place one of the rolled-out dough circles over the top of the filling, pressing gently to seal. Trim any excess dough around the edges, leaving about ½ inch overhang. Fold the overhang under itself to create a neat edge.
Brush the top crust with the beaten egg for a golden finish. Cut a few small slits in the center of the crust to allow steam to escape. Place the pie dish on a baking sheet to catch any drips and bake for 40-45 minutes until the crust is deep golden brown and the filling is bubbling around the edges. For extra crispiness, broil for 1-2 minutes at the end of baking.
Rest and Serve
Remove the pot pie from the oven and let it rest for 10 minutes before serving. This resting period allows the filling to set slightly and makes it easier to slice. Sprinkle the top with 0.25 cup chopped fresh parsley for a pop of color and freshness.
Slice into wedges and serve warm. The crust should be crisp and flaky, while the filling remains creamy and rich. Each bite should deliver tender chicken, sweet carrots, and a hint of thyme, all enveloped in a velvety gravy. This pot pie is the perfect comfort food for any occasion!
Pro Tips For Making Semi Homemade Chicken Pot Pie
- Brown the Chicken First: Skip the raw chicken in the filling—it’ll turn your pot pie into a stew. Sear the thighs in a hot pan with a little butter until golden (about 5 minutes per side), then shred before mixing with veggies. The extra flavor makes all the difference, and it keeps the filling from getting watery later.
- Cut Carrots Small: I used to slice them thick, thinking they’d soften enough. Wrong. Dice them into ¼-inch pieces so they melt into the filling without turning to mush. If you’re lazy, buy pre-cut baby carrots and halve them—still better than big chunks.
- Chill the Dough: Roll out the pie crust straight from the fridge, or it’ll stick like glue. Wrap it in plastic and let it rest for 15 minutes while you assemble the filling. Cold dough = easier handling, fewer tears, and a flakier crust.
- Add a Splash of Cream: The filling’s dry? Mix in 2 tablespoons of heavy cream or half-and-half with the veggies. It keeps the texture rich without making it soggy—just don’t skip the baking time. (Yes, even if you’re impatient like me.)
Essential equipment for semi homemade chicken pot pie
Dutch Oven Essentials
The Dutch oven is my secret weapon for this recipe—it distributes heat evenly and creates a golden crust when baking. I swear by the Le Creuset 5.5-quart for its durability and heat retention, but a Lodge cast iron Dutch oven works just as well for half the price.
Both handle the deep baking dish requirements perfectly and develop a natural non-stick patina over time. 🔥
Pie Dish Options
For the filling, you'll need a 9-inch pie dish that can handle both stovetop and oven heat. My go-to is a ceramic pie plate (like Pyrex) for its even heat distribution, but a deep 9-inch cast iron skillet works too—it adds extra crispiness to the crust edges.
Avoid thin metal pans that may warp under the filling's weight.
Pastry Tools Must-Haves
Rolling out pie dough requires the right tools: a 12-inch rolling pin (I use OXO Good Grips) for even pressure, and a pie crust cutter (or a glass bowl) to trim excess dough cleanly.
For the crust assembly, keep a sharp chef's knife handy to score the top before baking—this prevents puffing. A pastry brush (like Norpro) is essential for that perfect egg wash finish.
Mixing and Measuring
Precision matters for the crust: use a 16-ounce mixing bowl (like Rubbermaid Food Storage) for the dough, and a bench scraper to divide it evenly. For measuring, I recommend Weigh & Measure Kitchen Scale for butter and flour—it's more accurate than volume measurements.
A microplane comes in handy for zesting any extra lemon peel you might add for brightness.
Baking Essentials
Your oven needs to hit 375°F consistently, so I recommend a thermometer (like Thermoworks Oven Thermometer) to verify accuracy. A baking sheet underneath catches drips—use one with rimmed edges (like Wilton Half-Sheet Pans) for easy cleanup.
For extra crispiness, finish with 2 minutes under the broiler, watching closely to avoid burning.
Shortcut Substitutes
Short on time? Swap homemade crust for Pillsbury refrigerated pie crust—just press it into the dish and bake as directed. For the filling, pre-cut frozen veggies (like Birds Eye Steamed Veggies Mix) save chopping time.
A slow cooker can also handle the filling prep—just transfer to a pie dish before baking. The key is maintaining that creamy texture, so don't skip the heavy cream! 💫
Nutrition facts
Frequently asked questions
Can I use chicken breast instead of thighs for this recipe?
Chicken thighs are ideal because they stay juicy and tender while simmering in the filling. If you prefer breast, use 1.5 lb boneless, skinless breasts and cook them for 5-6 minutes per side until fully done before shredding. Add 1 tablespoon butter to the filling to compensate for the drier meat. The thighs' fat content keeps the pie extra moist.
How do I make the crust extra flaky without overworking the dough?
Keep everything cold! Use ice water for the dough and cold butter (cut into small cubes). Work quickly and avoid overmixing—just until the dough comes together. For extra flakiness, chill the dough for 20 minutes before rolling. The key is pea-sized butter pieces that melt into thin layers during baking.
What if my filling seems too thin or too thick?
For a thicker filling, simmer uncovered for 3-5 extra minutes to reduce. If too thick, stir in 1-2 tablespoons water or broth until creamy. The gravy should coat the back of a spoon but still be spoonable. Pro tip: If using frozen veggies, drain them well before adding to prevent excess moisture.
Can I prepare this pot pie ahead of time?
Assemble the pie (unbaked) up to 24 hours ahead and refrigerate. Bake straight from the fridge, adding 5-10 minutes to the cooking time. For freezing, bake the pie, cool completely, wrap tightly in foil, and freeze for up to 3 months. Reheat covered at 350°F for 20-25 minutes until warmed through.
What vegetables can I substitute for carrots and celery?
Try green beans, peas, or mushrooms for extra flavor. For a classic combo, swap in potatoes (diced and parboiled) or cauliflower florets. Keep the total volume similar to maintain filling consistency. Season with extra herbs if using milder veggies like zucchini.