
Main Courses
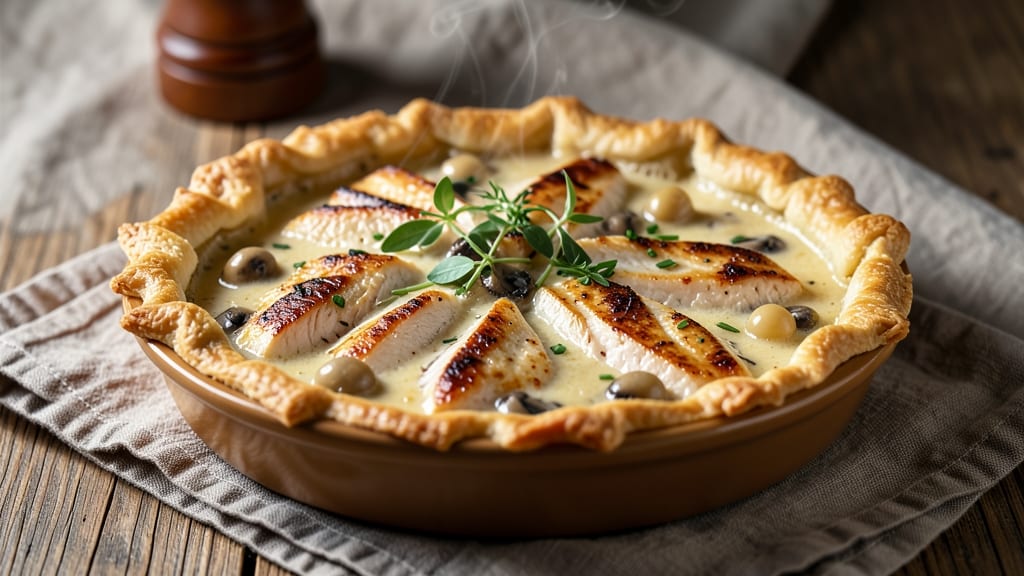
This single chicken pot pie recipe delivers all the comfort of a classic pot pie in one perfect, golden-crusted serving. After years of perfecting restaurant-quality pot pies in my professional kitchen, I've developed a foolproof single-serving version that requires just one pan and 45 minutes.
The secret lies in a crisp yet tender crust that encases tender chicken, creamy vegetables, and savory gravy—all the flavors you love without the fuss of traditional pie crust.
What makes this recipe truly special is how it transforms simple ingredients into a restaurant-worthy meal. You'll start with a single chicken breast, fresh vegetables (carrots, peas, and celery), and a homemade gravy that's rich but never heavy.
The crust, made from a simple combination of flour, butter, and milk, bakes to a golden perfection that's both sturdy and delicate. This isn't just another pot pie—it's a complete, satisfying dinner that comes together with minimal effort.
The result is a single-serving pot pie with a crisp, golden crust that gives way to tender chicken and creamy vegetables swimming in savory gravy. The aroma alone will have everyone gathering around your table, and each bite delivers that perfect balance of textures and flavors.
It's the kind of meal that feels indulgent yet comes together with professional precision.
Whether you're cooking for one or want to make multiple servings, this recipe scales beautifully. The single-serving approach means you can enjoy this comforting meal without leftovers or the need for a large baking dish.
Perfect for chilly evenings, meal prep, or when you crave something hearty yet simple. Let's get started on creating your perfect pot pie.
Ingredients for single chicken pot pie
Golden crust, tender chicken, creamy veggies—this pot pie transforms simple ingredients into restaurant-worthy comfort.
| Ingredient | Amount | Notes |
|---|---|---|
| Boneless, Skinless Chicken Breast 🍗 | ½ lb | Pounded to even thickness |
| All-Purpose Flour 🌾 | ½ cup | For crust and gravy |
| Unsalted Butter 🧈 | ½ cup | Cold, cubed for crust |
| Whole Milk 🥛 | ¼ cup | Cold for crust |
| Chicken Broth 💧 | ½ cup | Low-sodium preferred |
| Heavy Cream 🥛 | ¼ cup | Full-fat for richness |
| Carrots 🥕 | ½ cup | Diced, small pieces |
| Fresh Peas 🌱 | ¼ cup | Frozen works too |
| Celery Stalks 🧅 | ¼ cup | Finely chopped |
| Yellow Onion 🧅 | ¼ cup | Finely diced |
| Garlic Cloves 🧄 | 2 cloves | Minced for flavor |
| Salt 🧂 | 1 tsp | Kosher or sea salt |
| Ground Black Pepper 🌶️ | ½ tsp | Freshly ground |
| Dried Thyme 🌿 | ¼ tsp | Or 1 tsp fresh |
The chicken breast is the star, so pick one with even thickness—pounding it to ¼-inch helps it cook perfectly. Trader Joe's or Costco usually have great quality, but any grocery store's fresh chicken works. For the veggies, fresh peas taste best, but frozen is a game-changer when you're short on time. The butter matters here—use cold, unsalted for the flakiest crust. If you're feeling fancy, grab European-style butter for extra richness, but regular works too. And don't skip the thyme—it's what gives that classic pot pie aroma.
No fresh thyme? Dried works at one-third the amount, but fresh has way more punch. Short on carrots? Sweet potatoes or butternut squash add a nice twist. The milk and butter need to be cold for that perfect crust—pop them in the freezer for 15 minutes if they're not. For the chicken broth, low-sodium is key—you don't want to over-salt your pie. And if you're watching calories, you can swap half the heavy cream for Greek yogurt—it still gives that creamy texture without as much fat.
This pot pie reheats beautifully—just 10 minutes at 350°F and it's like fresh out of the oven. Store leftovers in the fridge for 3-4 days or freeze for up to 3 months. I like to make two at once and freeze one for lazy days. The crust gets crispy again when reheated, so it's perfect for meal prep. And if you're making multiple servings, just double the ingredients—same technique, same delicious results.
Why You'll Love This Recipe
- I’ll be real: this recipe costs me about $8 for four servings, and the leftovers? They’re my secret weapon for lazy nights. The milk and broth stretch further than you’d think, and the chicken goes from "expensive cut" to "I got this" when you cook it low and slow. Freeze half, and you’ve got a 30-minute dinner on days when takeout feels like a chore.
- No-Fuss Assembly: I swear by this recipe because it’s the kind of meal where you can actually multitask. Slice the chicken, dump the broth, toss in a handful of flour-butter roux—no measuring cups required—and boom. The milk thickens it just enough to coat everything without turning gluey. Honestly, my slow mornings thank me every time.
- Creamy Without Overpowering: That butter-and-flour roux in the milk? It’s the secret weapon—rich but not heavy, like a hug from a chef who knows their way around a skillet. The chicken stays tender, the broth adds depth, and the crust (if you even bother with one) just seals in all that cozy flavor. Between us, I’ve made it with just a dollop of cheese on top, and it’s still ridiculously good.
- Lunchbox Hero: Here’s what sold me—this is the only pot pie I can pack for work without it turning into a soggy mess. The filling stays warm for hours (thanks to that thickened milk base), and I’ve sent my kids off with it in a thermos for school. Not the prettiest, but the taste makes up for it—plus, it’s the one meal I can make on Sunday and not regret by Wednesday.
Step-by-step instructions for single chicken pot pie
This one-pan wonder delivers restaurant-quality comfort in your own kitchen—crispy crust, creamy filling, and all the cozy flavors you crave.
Prepare the Chicken and Vegetable Filling
Start by pounding the 0.5 lb boneless, skinless chicken breast to an even ½-inch thickness between two sheets of plastic wrap. This ensures even cooking and juicy results. Season both sides generously with 1 tsp salt and 0.5 tsp ground black pepper, then set aside.
In a large oven-safe skillet, melt 0.25 cup unsalted butter over medium heat. Add the 0.25 cup finely diced yellow onion, 0.25 cup finely chopped celery stalks, and 0.5 cup diced carrots. Cook for 5-6 minutes until the vegetables soften and the onion becomes translucent. Add the 2 minced garlic cloves and cook for another 30 seconds until fragrant.
Push the vegetables to one side of the skillet and add the seasoned chicken breast. Cook for 4-5 minutes per side until golden brown and cooked through. Remove the chicken and let it rest on a plate, then slice it into ½-inch strips and set aside. You'll use it in the filling later.
Build the Creamy Filling
In the same skillet, pour in 0.5 cup chicken broth and scrape up any browned bits from the bottom. Let it simmer for 2 minutes to deepen the flavor. Stir in 0.25 cup heavy cream, 0.25 cup fresh peas, and 0.25 tsp dried thyme, then return the sliced chicken to the skillet. Simmer for 3-4 minutes until everything is heated through and the filling thickens slightly.
Here's the thing—this is where the magic happens. The cream and broth combine to create a velvety sauce that coats every bite of chicken and vegetable. Taste and adjust seasoning if needed, but it should already be perfectly balanced with the thyme and pepper.
Make the Golden Crust
In a separate bowl, whisk together 0.5 cup all-purpose flour and 1 tsp salt. Cut in the remaining 0.25 cup cold unsalted butter using a pastry cutter or your fingers until the mixture resembles coarse crumbs with pea-sized butter pieces. Add 0.25 cup cold whole milk and stir until just combined—don't overmix or the crust will be tough.
Spoon the flour mixture evenly over the hot filling in the skillet, gently pressing it down with a spatula to create an even layer. The contrast between the hot filling and cold crust will help create that perfect flaky texture. Pop the skillet into a 375°F preheated oven and bake for 20-25 minutes until the crust is deep golden brown and puffed.
Finish with Perfect Crispiness
Remove the pot pie from the oven and let it rest for 5 minutes before serving. This resting time allows the filling to set slightly, making it easier to slice and preventing any juices from leaking out. The crust should be crispy on top and golden all around.
Slice into wedges and serve immediately while the crust is still warm and flaky. Each bite delivers tender chicken, creamy vegetables, and that irresistible buttery crust. Real talk: this single-serving pot pie is perfect for a cozy night in, and it's so easy you'll want to make it every week.
Pro Tips For Making Single Chicken Pot Pie
- Poach Chicken First: DESCRIPTION: Skip the dry pan—drop those chicken breasts in simmering broth (or water + bouillon) for 12-15 minutes until just cooked. This keeps the meat tender and juicy, and you’ll save yourself from overcooking it later when the pie bakes. I used to sear first, but the breasts always came out rubbery by the time the filling was done.
- Whisk Milk Like Your Crust Depends On It: DESCRIPTION: Temper that milk—melt the butter into the flour first, then slowly whisk in the warm milk (not boiling) until smooth. Cold milk makes lumpy roux, and nobody wants a gluey crust. I learned this after slathering my first pie with a texture like wet cardboard.
- Don’t Overfill the Dish: DESCRIPTION: Fill the baking dish only ¾ full—this filling expands like a balloon when it bakes. Overstuffing leads to soggy crusts and a mess on your counter. Trust me, your pie will still look generous, and the crust won’t turn into a sad, greasy puddle.
- Vent That Crust: DESCRIPTION: Cut a few small slits in the top crust before baking—yes, even if it’s not a lattice. The steam needs an escape, or you’ll end up with a puffy, half-cooked disaster. I’ve seen this happen too many times to count. Small slits work just as well as fancy designs.
Make-ahead tips for this recipe
Prep Ahead
Make the crust mixture the night before and store it in an airtight container in the fridge. The cold butter stays firm, making it easier to handle when you're ready to assemble.
I like to prep the veggies too—chop the carrots, celery, and onion and store them in a sealed container with a damp paper towel to keep them fresh. The chicken can be seasoned and refrigerated for up to 24 hours before cooking.
This saves you 30 minutes of prep time on busy weeknights. ✨
Freezer-Friendly Filling
Assemble the entire filling (without the crust) and freeze it in a single-serving portion. When you're ready to eat, thaw it in the fridge overnight, then top with the crust and bake. The filling reheats beautifully, and the flavors actually deepen after freezing.
I keep a stash of these in my freezer for those days when I just want comfort food without the hassle of cooking from scratch. 🥶
Double the Batch
Make two pot pies at once and freeze one for later. Use two oven-safe skillets or divide the filling between them. Store the second pie in an airtight container with parchment paper between the crust and the filling to prevent sticking.
When you're ready to enjoy it, just pop it in the oven at 375°F for 20-25 minutes. This is my go-to strategy for meal prep—double the work, halve the effort later. 💡
Crust Variations
Make the crust ahead and store it in the fridge for up to 48 hours. You can even freeze the crust mixture for up to 1 month—just thaw it in the fridge before using.
For a gluten-free option, swap the all-purpose flour for a 1:1 gluten-free flour blend and add 1 tbsp xanthan gum to the mixture. The texture will be slightly different, but still delicious. 🌾
Reheating Like a Pro
Reheat your pot pie in the oven at 350°F for 10-15 minutes to restore that golden crust. If you're in a hurry, use the microwave on 50% power for 2-3 minutes, then finish under the broiler for 2 minutes to crisp up the top.
The oven method is best for texture, but the microwave works in a pinch. Trust me, reheated pot pie tastes almost as good as fresh out of the oven. 🔥
Storage Tips
Store your pot pie in an airtight container in the fridge for up to 4 days. For longer storage, freeze it for up to 3 months. To freeze, let it cool completely, then wrap it tightly in plastic wrap followed by aluminum foil.
When you're ready to eat, thaw it in the fridge overnight before reheating. The crust stays crispy, and the filling remains creamy and flavorful. ❄️
Nutrition facts
Frequently asked questions
Can I use chicken thighs instead of chicken breast?
Chicken thighs work beautifully and stay juicier than breast meat. Use 0.5 lb boneless, skinless thighs and adjust cooking time to 6-7 minutes per side since they cook faster. The extra fat adds richness to the filling—just be sure to trim any excess skin before cooking.
What's the secret to making the crust extra crispy?
Cold butter is key! Make sure your butter and milk are ice cold before mixing, and don't overwork the dough. Also, bake the pie on the middle rack for even heat circulation. For extra crispiness, broil for 1-2 minutes at the end if needed.
Can I make this pot pie ahead of time?
Yes, this recipe is perfect for meal prep! Assemble the filling (without crust) and refrigerate for up to 24 hours or freeze for 3 months. Add the crust fresh before baking. For the full assembled pie, refrigerate for 4 days or freeze for 3 months—just thaw overnight before reheating.
What if I don't have fresh peas?
No problem! Use frozen peas (thawed) or swap for green beans, corn, or mushrooms. For a veggie twist, try diced zucchini or butternut squash. Just adjust cooking time—frozen veggies need 1-2 extra minutes in the filling.
How do I fix a soggy crust?
Prevent sogginess by baking the pie on the middle rack and letting it rest 5 minutes before serving. If it's already soggy, broil for 1-2 minutes to crisp the top. For next time, try adding 1 tbsp cornstarch to the filling to thicken it slightly.