
Main Courses
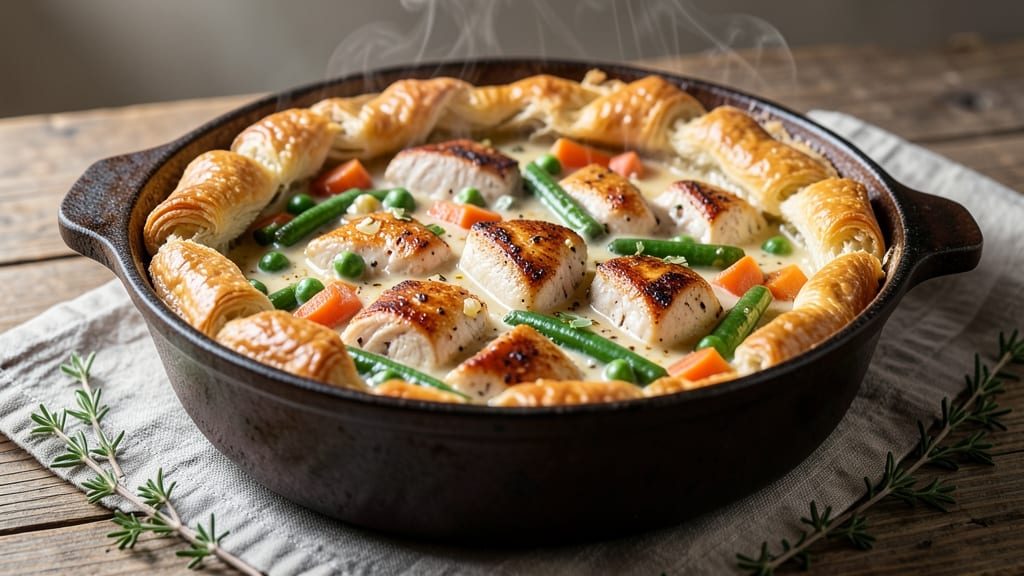
This single pot pie recipe delivers restaurant-quality comfort food with minimal cleanup—just one pan for the entire process. The secret lies in a creamy, savory filling that transforms into golden, flaky layers when topped with homemade or store-bought crust.
I've perfected this technique to ensure the filling stays luscious while the crust achieves that signature crispy crunch, all without requiring pie dishes or complicated assembly.
What sets this recipe apart is its versatility—you can customize the filling with chicken, vegetables, mushrooms, or even plant-based proteins like tofu, while the crust remains foolproof whether you make it from scratch or use a pre-made shortcut.
The filling simmers in one pot, releasing flavors that meld together beautifully, and the assembly takes just minutes before baking. This is the kind of meal that feels indulgent yet effortless, perfect for weeknights when you crave comfort without the fuss.
The result is a pot pie with a golden, shatteringly crisp crust and a filling so rich and flavorful it practically melts in your mouth. Each bite delivers layers of texture—crunchy, creamy, and tender—all in one perfect package.
The aroma alone will have everyone gathering at the table, and the best part? Only one pan to wash afterward. This recipe proves that homemade comfort food can be both impressive and incredibly practical.
Whether you're feeding a family or treating yourself to a cozy meal, this single pot pie delivers on every promise—rich flavors, satisfying textures, and a method that respects your time. Let's get started on creating a dish that feels like a hug in edible form.
Ingredients for single pot pie
Here's everything you need to create this restaurant-quality single pot pie with minimal effort.
| Ingredient | Amount | Notes |
|---|---|---|
| Chicken Breast 🍗 | 1 ½ lb | Boneless, skinless, cut into bite-sized pieces |
| Creamy Chicken Broth 🥄 | 1 ½ cups | Homemade or high-quality store-bought |
| Heavy Cream 🥛 | ½ cup | Full-fat for richest texture |
| Frozen Mixed Vegetables 🥕 | 1 ½ cups | Peas, carrots, corn—whatever you prefer |
| Yellow Onion 🧅 | 1 whole | Diced, for flavor base |
| Garlic Cloves 🧄 | 3 cloves | Minced, aromatic foundation |
| All-Purpose Flour 🌾 | 2 tbsp | For thickening filling |
| Salt 🧂 | 1 ½ tsp | Diamond Crystal preferred |
| Black Pepper 🌶️ | ½ tsp | Freshly ground for best flavor |
| Dried Thyme 🌿 | 1 tsp | Or 1 tbsp fresh thyme |
| Unsalted Butter 🧈 | ½ cup | Cold, cubed for crust |
| All-Purpose Flour 🌾 | 1 ½ cups | Plus 1 tsp salt for crust |
| Ice Water 💧 | ¼ cup | For dough elasticity |
| Parmesan Cheese 🧀 | ¼ cup | Freshly grated, optional topping |
The chicken breast is your protein foundation—look for plump, evenly sized pieces at the grocery store's butcher counter. Costco or Whole Foods often carry pre-cut chicken that saves time. For extra flavor, marinate the pieces in a little olive oil, salt, and pepper before adding to the pot. The frozen veggies are a game-changer here—they're already prepped and packed with nutrients. If you prefer fresh, use whatever seasonal vegetables you have on hand (peas, carrots, mushrooms, or green beans all work beautifully). The key is to keep them roughly chopped so they cook evenly with the chicken.
No heavy cream? Coconut milk or half-and-half works in a pinch, though the texture will be slightly different. Swapping frozen veggies for fresh? Use half the amount since they won't release as much moisture. For the crust, if you don't want to make it from scratch, Pillsbury or store-bought pie crust is perfectly acceptable—just roll it out and cut into strips. The butter for the crust needs to be cold; pop it in the freezer for 10 minutes before cutting it into cubes. And if you're feeling adventurous, add a sprinkle of nutritional yeast to the crust for a cheesy flavor without dairy.
This filling keeps beautifully in the fridge for 3 days—perfect for making ahead. If you're prepping for a crowd, freeze the unbaked pie for up to 2 months. The crust gets crispier after baking, so if you're short on time, assemble it and refrigerate overnight before baking. For serving, a sprinkle of fresh parsley or thyme adds a pop of color. The leftovers reheat wonderfully in the microwave or oven—just cover with a damp paper towel to keep the crust from drying out.
Why You'll Love This Recipe
- One-Pot Magic: I swear by this recipe when I’m too tired to dirty more than one pan. Just toss in the chicken, frozen veggies, and onion—no fancy prep, no stress. The broth and cream do all the heavy lifting while I sip wine and pretend I’m not cooking.
- Rich Without Effort: That heavy cream and chicken broth combo? It’s the secret to a sauce so velvety, you’ll forget it’s basically a dump-and-go meal. The onions caramelize just enough to add depth, and the veggies stay tender-crisp—no mushy surprises here.
- Meal Prep MVP: Between us, this is my go-to for lunches all week. The filling reheats like a dream (microwave or oven, no judgment), and the flavors actually get better the next day. Honestly, I make a double batch just to avoid takeout.
- Budget-Creamy Luxury: Heavy cream might sound fancy, but a little goes a long way, and frozen veggies cut costs without sacrificing taste. Plus, leftovers stretch for days—perfect when you’re feeding a crowd or just tired of eating out. My wallet thanks me every time.
Step-by-step instructions for one-pan savory crunch and creamy filling fusion
This single pot pie delivers restaurant-quality texture in one pan—creamy filling meets golden crust without the fuss.
Sear the Chicken and Build Flavor Base
Heat a large Dutch oven over medium-high heat and add the 1.5 lb chicken breast cut into bite-sized pieces. Season immediately with 1 tsp salt, 0.5 tsp black pepper, and 1 tsp dried thyme. Sear for 4-5 minutes until the chicken is golden brown and cooked through—you'll see it release easily from the pan. Remove and set aside.
In the same pot, add 0.5 cup unsalted butter and let it melt completely. Toss in the 1 whole yellow onion and 3 cloves garlic cloves, cooking for 3-4 minutes until softened and fragrant. This step forms the aromatic foundation for your filling. The butter's richness will carry through to create that luscious creaminess you're after.
Thicken the Creamy Filling Mixture
Sprinkle the 2 tbsp all-purpose flour over the onion-garlic mixture and stir vigorously for 1-2 minutes to cook out the raw flour taste. Slowly pour in the 1.5 cups creamy chicken broth while whisking constantly to prevent lumps. Bring to a gentle simmer and cook for 3-4 minutes until slightly thickened.
Return the seared chicken to the pot and stir in the 1.5 cups frozen mixed vegetables and 0.5 cup heavy cream. The vegetables will thaw quickly in the warm mixture. Season with the remaining 0.5 tsp salt and 0.5 tsp black pepper. Simmer for another 5 minutes until the filling reaches a velvety consistency—it should coat the back of a spoon when tested.
Prepare the Crust Dough
In a separate bowl, combine the 1.5 cups all-purpose flour with 1.5 tsp salt (already included in your ingredients). Cut in the 0.5 cup cold unsalted butter using a pastry cutter or your fingers until the mixture resembles coarse crumbs with pea-sized butter pieces. This texture is crucial for creating flaky layers in your crust.
Drizzle in the 0.25 cup ice water gradually while mixing with a fork until the dough just comes together. The dough should be cool to the touch—if it's sticky, add 1 more tablespoon of flour. Turn the dough out onto a lightly floured surface and knead gently 4-5 times just to combine. Divide into two equal pieces and flatten each into a 6-inch round about ¼-inch thick. This will be your crust topping.
Assemble and Bake to Golden Perfection
Return the filling to a gentle simmer and let it cook uncovered for 2 minutes to ensure all flavors meld together. Spoon the filling into your Dutch oven and smooth the top. Place one of the flattened dough rounds over the filling, pressing gently to seal. Top with the second dough round, pressing edges to create a seal. Cut 4 slits in the top to allow steam to escape.
Preheat your oven to 375°F. Place the assembled pot pie on a baking sheet (for easy transfer) and bake for 35-40 minutes until the crust is deep golden brown and puffed slightly. The filling should bubble through the slits, and the crust should be crispy to the touch. For extra browning, broil for 1-2 minutes at the end, watching closely to prevent burning.
Rest and Serve with Crunchy Topping
Remove from the oven and let the pot pie rest for 10 minutes before serving. This resting period allows the filling to set slightly and the crust to firm up. While resting, sprinkle the 0.25 cup freshly grated Parmesan cheese evenly over the top for an extra layer of flavor and crunch.
Slice into wedges and serve immediately. Each bite should deliver that perfect contrast of creamy, savory filling with a crispy, flaky crust. The vegetables should be tender-crisp, the chicken juicy, and the whole dish bursting with thyme and garlic aroma. This is comfort food at its finest—all in one pan!
Pro Tips For Making Single Pot Pie
- Sear Chicken First: Don’t just toss raw chicken into the pot—cut it into even 1-inch pieces, pat them dry, and sear them in a hot skillet with a little oil until golden on all sides. This adds flavor depth and prevents the chicken from turning rubbery later. (Yes, even if you're impatient like me, resist the urge to skip this.)
- Thaw Veggies Properly: Dump frozen mixed veggies straight into the pot? Big mistake. Spread them on a baking sheet and let them thaw in the fridge overnight—or at least for 30 minutes before cooking. This keeps them from steaming into a sad, watery mush instead of crisp-tender bites.
- Simmer, Don’t Boil: After adding the heavy cream, lower the heat to a gentle simmer, not a rolling boil. Heavy cream curdles faster than you think, and you’ll end up with a lumpy, sad pie instead of a creamy one. (Your future self will thank you.)
- Strain the Broth: Use store-bought creamy chicken broth? Strain it through a fine-mesh sieve first to remove any grit or bits. It’s a 30-second step that makes a real difference in texture—smooth, not gritty. (I was skeptical until I tried it.)
Best sauces and condiments for these flavors
Creamy Herb Sauce
This filling is where the magic happens—elevate it with a homemade herb cream sauce made from the heavy cream, chicken broth, and fresh thyme. Simmer these together with a pinch of salt and black pepper until slightly thickened, then blend until ultra-smooth.
Pour this velvety sauce over the chicken and veggies just before baking for an extra-luscious finish. For a richer version, whisk in 1 tbsp Dijon mustard to balance the creaminess. 🥄
Garlic-Butter Glaze
Transform your pot pie into a showstopper with a garlic-butter glaze drizzled over the crust before baking. Melt 2 tbsp unsalted butter with 2 minced garlic cloves and 1 tsp fresh lemon juice in a small saucepan.
Brush this golden mixture over the crust just before the final 10 minutes of baking. The aroma will fill your kitchen, and the crust will develop a stunning caramelized finish. Use a pastry brush for even coverage. 🧄
Spicy Tomato Topping
For a tangy twist, blend ½ cup crushed tomatoes, 1 tbsp tomato paste, 1 tsp smoked paprika, and ½ tsp cayenne pepper into a smooth sauce. Spread this over the filling before adding the crust, then bake as directed.
The acidity cuts through the richness while adding depth. For extra heat, top with chopped jalapeños after baking. This works especially well with chicken or mushroom fillings. 🌶️
Cheesy Crust Variations
Skip the Parmesan topping and create a cheesy crust instead. Mix ½ cup shredded cheddar and ¼ cup grated Gruyère into the dough before rolling it out. The cheese melts during baking, creating a bubbly, golden crust with every bite.
For a vegan option, use nutritional yeast and vegan butter in the dough and top with vegan Parmesan. The result is just as crispy and flavorful! 🧀
Dijon Mustard Swirl
Add a bright, tangy kick by swirling 1 tbsp Dijon mustard into the filling before baking. The mustard’s sharpness contrasts beautifully with the creamy sauce and flaky crust. For a visual pop, drizzle the mustard in concentric circles on top of the filling before adding the crust.
This technique works especially well with chicken or turkey fillings. 💛
Herb-Infused Oil Drizzle
Finish your pot pie with a herb-infused oil drizzle for extra aroma and moisture. Heat 2 tbsp olive oil with 1 tbsp chopped fresh parsley, 1 tsp chopped fresh thyme, and a pinch of salt until fragrant.
Drizzle this over the baked pie just before serving. The oil keeps the crust tender while adding a fresh, herby note that brightens every bite. 🌿
Nutrition facts
Frequently asked questions
Can I make this single pot pie without a Dutch oven?
Use a deep oven-safe skillet or even a cast-iron pan that's at least 10-inch in diameter. The key is choosing a pan with tall sides to prevent filling from spilling over during baking. A standard baking dish with a lid also works—just ensure it's oven-safe and can handle 375°F temperatures. The filling will still develop that perfect creamy texture, and the crust will achieve the same golden finish.
How do I make the crust extra crispy?
For a shatteringly crisp crust, chill the dough for 30 minutes before rolling it out. Brush the top with a beaten egg wash before baking, and sprinkle with coarse cornmeal or crushed cornflakes for added crunch. Bake on the lower oven rack for the first 15 minutes to maximize browning. The secret lies in high heat and proper ventilation—those 4 slits in the crust are crucial for steam escape!
Can I substitute chicken with another protein?
Yes! Swap chicken for ground turkey, shrimp, or mushrooms for a vegetarian version. For seafood, use 1 lb shrimp (peeled and deveined) and reduce the broth to 1 cup since shrimp release moisture. For mushrooms, use 8 oz sliced cremini or shiitake and sauté them until golden before adding other ingredients. The cooking time may vary slightly, so adjust accordingly.
Why is my crust soggy after baking?
Soggy crusts usually happen when steam gets trapped or the filling isn't fully cooked before adding the crust. Always pre-cook the filling until it's thick and bubbly, then let it cool slightly before assembling. Cut those 4 slits in the crust to let steam escape, and consider baking on a baking sheet to catch any drips. For extra insurance, brush the crust with egg wash just before baking to create a protective barrier.
Can I make this ahead of time?
This pot pie freezes beautifully! Assemble it completely (including crust), cover tightly with plastic wrap and foil, and freeze for up to 2 months. Thaw overnight in the fridge before baking. For make-ahead convenience, prepare the filling and crust separately, then assemble just before baking. The filling keeps well in the fridge for 3 days—perfect for meal prep. Reheat leftovers covered with a damp paper towel to maintain crust crispness.