
Desserts
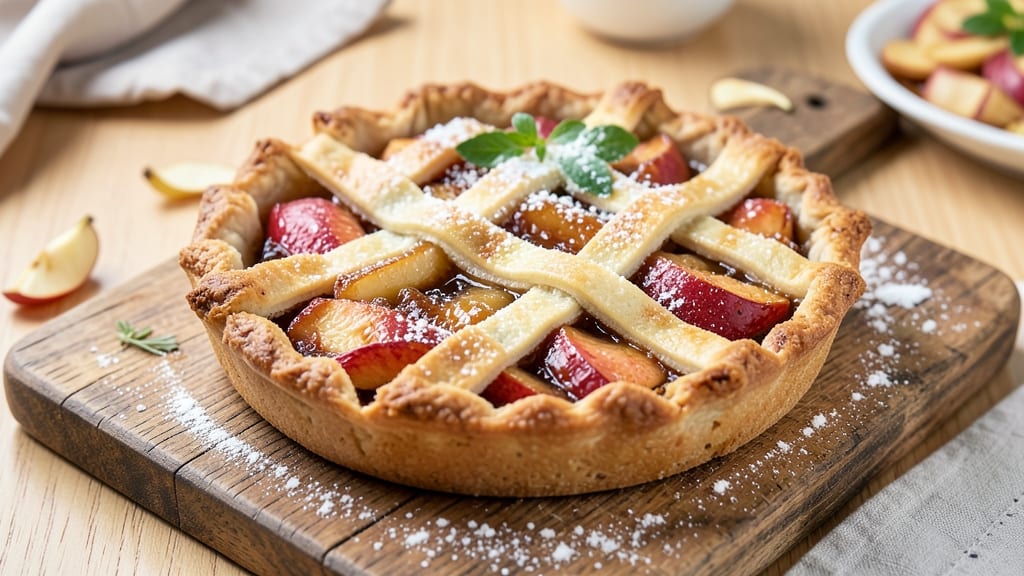
This small Dutch apple pie recipe brings the cozy charm of traditional Dutch baking to your kitchen—perfect for individual servings or charming gatherings. 🍏 The secret lies in a tender, lattice-topped crust filled with warmly spiced apples, creating a balance of crisp edges and tender filling that’s both nostalgic and delightfully modern.
Dutch apple pies are known for their rich cinnamon and nutmeg flavors, and this recipe preserves that authenticity while adapting it for easy home baking.
The recipe starts with a simple, foolproof pie crust that’s rolled out thin and cut into mini circles—ideal for single servings or a cute dessert spread.
The filling combines tart apples with a mix of brown sugar, cinnamon, and a touch of lemon juice, ensuring the perfect balance of sweet and tangy. Baking at a steady temperature guarantees a golden crust and a filling that’s just tender enough, with a hint of caramelization at the edges.
What makes these mini pies special is their versatility. Serve them warm with a scoop of vanilla ice cream for a classic touch, or dust them with powdered sugar for an elegant finish.
The lattice crust isn’t just decorative—it adds texture and allows the apples to peek through, making every bite feel like a little taste of the Netherlands. Whether you’re baking for a family dinner or a holiday treat, these pies are sure to impress.
Ready in about 45 minutes, this recipe is designed to be approachable yet impressive. The dough can be prepped ahead, and the filling comes together in just a few minutes, making it a perfect project for cooks of all levels.
Once you try these small Dutch apple pies, you’ll find yourself reaching for the recipe again and again—trust me, the aroma alone is worth the effort.
Ingredients for small dutch apple pie
Twelve cozy mini pies with that perfect Dutch apple pie balance of crisp crust and spiced filling.
| Ingredient | Amount | Notes |
|---|---|---|
| All-Purpose Flour 🌾 | 2 ½ cups | Plus 2 tbsp for dusting |
| Unsalted Butter 🧈 | 1 cup | Cold, cubed, for crust |
| Granulated Sugar 🍚 | ¼ cup | For crust sweetness |
| Ice Water 💧 | ½ cup | For dough binding |
| Tart Apples 🍏 | 4 medium | Granny Smith or Honeycrisp |
| Light Brown Sugar 🍚 | ¾ cup | Packed, for filling |
| Ground Cinnamon 🌿 | 2 tbsp | For warm spice flavor |
| Ground Nutmeg 🌿 | ½ tsp | Freshly grated preferred |
| Lemon Juice 🍋 | 1 tbsp | Freshly squeezed |
| Large Eggs 🥚 | 1 whole | For egg wash |
| Vanilla Extract 🌸 | ½ tsp | Pure, for filling depth |
| Salt 🧂 | ½ tsp | Fine sea salt |
| Powdered Sugar 🍚 | ¼ cup | For dusting finished pies |
The apples are everything here—Granny Smith or Honeycrisp are my go-tos for that perfect tart-sweet balance. Local farmers markets often have the best selection, but the grocery store will do in a pinch. Peeling them is optional (I usually do), but coring and slicing them evenly is key. Costco sells pre-sliced apples in the baking section if you're really short on time. The cinnamon should be fresh—if it smells dusty, toss it. Penzeys sells it in small tins that stay potent for months.
No Granny Smiths? McIntosh or Braeburn work too—they just get softer faster. Short on brown sugar? White sugar plus 1 tsp molasses mimics that caramel depth. The nutmeg is non-negotiable for that classic Dutch flavor, but if you're out, allspice at half the amount gives a similar warmth. For the crust, I always use King Arthur flour—it's a step above store brands. And if you're making these ahead, freeze the unbaked pies on a tray first—they bake beautifully straight from frozen.
The dough keeps for 3 days wrapped in plastic in the fridge, or 3 months frozen. The filling can be prepped a day ahead—just don't add the lemon juice until right before baking. These pies reheat beautifully—5 minutes at 350°F brings back all that apple aroma. I always make a double batch because they disappear fast, especially when dusted with that powdered sugar right after baking. Store them in an airtight container at room temp for 2 days or freeze for 1 month.
Why You'll Love This Recipe
- No-Roll Crust Trick: I swear by this cold butter method—just mix flour, sugar, and ice water until it holds. No rolling pins, no stress, and the flaky layers still happen. (Yes, even when my hands are covered in apple peel.)
- Tart-Sweet Magic: That balance of crisp Granny Smiths and caramelized sugar? It’s like autumn in your mouth. The butter in the crust melts into the apples, making every bite buttery and bright—no pie filling gloop here.
- Weeknight Hero: Slice it warm with vanilla ice cream for dessert, or pack individual portions for lunches. The small size means it bakes fast (under 40 minutes) and disappears just as quick—no sad leftovers lingering for days.
- Budget-Friendly Luxury: Four basic ingredients, yet it tastes like a bakery showstopper. The sugar and butter stretch far, and tart apples stay cheap when you buy them in bulk. Honestly, the only thing pricier is the joy of watching someone take their first bite.
Step-by-step instructions for small Dutch apple pies
Here's how to make these bite-sized apple pies with flaky crusts and spiced filling that'll disappear fast.
👨🍳 Step 1: Make the Perfect Crust Dough
In a large bowl, combine the 2.5 cups all-purpose flour and 0.25 cup granulated sugar. Cut in the 1 cup cold cubed unsalted butter using a pastry cutter or your fingers until the mixture resembles coarse crumbs with pea-sized butter pieces. This texture is crucial—it creates flaky layers when baked.
Add the 0.5 tsp salt and mix until evenly distributed. Then drizzle in the 0.5 cup ice water all at once, stirring gently with a fork just until the dough comes together. Avoid overmixing—you want a slightly shaggy dough. Shape into a disk, wrap in plastic, and chill for 30 minutes. This resting period relaxes the gluten for a tender crust.
🍳 Step 2: Prepare the Spiced Apple Filling
While the dough chills, peel, core, and dice the 4 medium tart apples into ¼-inch pieces. In a large bowl, combine the diced apples with the 0.75 cup packed light brown sugar, 2 tbsp ground cinnamon, 0.5 tsp ground nutmeg, and 1 tbsp freshly squeezed lemon juice. Toss gently to coat the apples evenly—this brightens their flavor and prevents browning.
Add the 0.5 tsp vanilla extract and mix again. Let the filling sit for 10 minutes while you roll out the dough. This resting time allows the spices to bloom and the juices to release slightly, creating a more flavorful filling. If your apples are particularly juicy, you might want to drain excess liquid after 10 minutes to prevent soggy crusts.
🥘 Step 3: Roll and Cut the Dough
On a lightly floured surface, roll out the chilled dough to about ⅛-inch thickness. Use a 4-inch round cutter to cut out 12 circles—you should have enough dough for 12 pies with some scraps for patching. I like to keep a small bowl of flour nearby to prevent sticking while rolling.
Place each dough circle on a parchment-lined baking sheet, spacing them about 1 inch apart. Use your thumb to press a shallow ½-inch well in the center of each circle—this creates room for the filling without overflow. Keep the extra dough scraps wrapped in plastic until ready to use for patching.
🍳 Step 4: Assemble and Fill the Pies
Spoon about 2 tablespoons of the apple filling into each dough circle, mounding it slightly in the center. Then, using the 4-inch cutter, cut out another 12 dough circles for tops. Brush the edges of the bottom crusts with the beaten egg (crack the egg into a small bowl and whisk lightly with a fork).
Place a top crust over each pie, pressing gently around the edges to seal. Use a fork to crimp the edges decoratively—press the tines into the crust and twist slightly to create a classic lattice pattern. This not only looks beautiful but also helps trap steam for a tender crust. If you have any leftover dough scraps, roll them out thin and cut into strips for lattice patterns on top.
🔥 Step 5: Bake to Golden Perfection
Preheat your oven to 375°F. Bake the pies for 25-30 minutes until the crusts are deep golden brown and the filling is bubbling. The edges should be puffed and slightly crisp, while the tops should have a few spots of caramelization. If the tops brown too quickly, tent them loosely with aluminum foil after 15 minutes to prevent over-browning.
Remove from the oven and let cool on the baking sheet for 10 minutes. While they're still warm, dust generously with the 0.25 cup powdered sugar using a fine-mesh sieve. Serve warm with a scoop of vanilla ice cream or whipped cream—these mini pies are perfect for parties, potlucks, or a cozy dessert after dinner.
Pro Tips For Making Small Dutch Apple Pie
- Chill the Dough Hard: I learned this the hard way—rolling out cold dough is a nightmare. Wrap the dough in plastic and freeze it for 20 minutes before rolling. This keeps it firm, prevents shrinking, and makes handling way easier, especially for a small pie where precision matters.
- Slice Apples Thin and Toss Dry: Skip the pre-slicing soak—it makes the filling soggy. Instead, slice apples paper-thin (⅛-inch) and toss them with sugar right after cutting. The residual moisture will caramelize beautifully in the oven, and you’ll avoid that mushy texture that ruins Dutch apple pie.
- Preheat Pan Before Blind-Baking: Your oven might be hot, but the pie pan isn’t. Preheat the pan on the middle rack for 5 minutes before adding the dough. This guarantees an even bake and prevents the crust from puffing unevenly—critical for a small pie where every inch counts.
- Use Cold Butter in the Filling: I was skeptical until I tried it—cut the butter into tiny cubes and fold them into the apple mixture cold. As the pie bakes, the butter melts into the filling, creating pockets of richness. Warm butter just dissolves into a paste, and you lose that perfect texture.
Storing and reheating this small dutch apple pie
Refrigerator Storage
Store your mini Dutch apple pies in an airtight container at room temperature for up to 2 days—they keep beautifully thanks to their small size. If refrigerating, place them in a single layer on a wire rack inside a container to prevent sogginess.
The crust stays crisp, and the filling maintains its perfect balance of spiced sweetness. I always make a double batch because they disappear fast! ❄️
Freezer-Friendly Tips
For longer storage, freeze unbaked pies on a parchment-lined tray for 1 hour before transferring to a freezer bag. This prevents sticking. Bake straight from frozen at 375°F for 35-40 minutes, adding 5-10 extra minutes if needed.
The texture remains tender, and the spiced apple filling stays vibrant. Label bags with the date—these keep for up to 3 months without losing quality.
Reheating Perfection
Warm pies from the fridge at 350°F for 5-7 minutes to restore their cozy aroma. Place them on a baking sheet to catch any filling drips. For microwave reheating, cover with a damp paper towel and heat in 20-second bursts until warmed through.
Avoid overcooking—they reheat best when just warmed, not fully baked again. A sprinkle of powdered sugar after reheating brings back that fresh-from-oven magic. 🔥
Make-Ahead Filling
Prepare the spiced apple filling 1 day ahead and store it in an airtight container in the fridge. Just add the lemon juice right before assembling the pies to keep the apples bright. The flavors meld beautifully overnight, deepening the cinnamon and nutmeg notes.
This is my secret for stress-free baking—especially when hosting guests. The crust dough can also be prepped ahead and stored for 3 days in the fridge. ✨
Serving Warm vs. Cold
These mini pies shine when served warm, straight from the oven, with a scoop of vanilla ice cream or a dollop of whipped cream. For a room-temperature option, let them cool completely before packing in a lidded container.
The contrast of warm filling and cool crust is magical. I often pack them in a picnic basket with a thermos of chai tea for a Dutch-inspired dessert spread. 🍵
Garnish Refreshers
Revive slightly stale pies by brushing the tops with melted butter and baking at 350°F for 3-5 minutes. Finish with a dusting of powdered sugar and a sprinkle of toasted flaked almonds for crunch.
A drizzle of caramel sauce adds a modern twist. These tricks make reheated pies taste almost as good as fresh-baked—perfect for breakfast or an after-dinner treat! 💫
Nutrition facts
Frequently asked questions
Can I make these mini apple pies without a pie cutter?
Use a 4-inch round bowl or even a glass jar with a diameter of about 4 inches to cut your dough circles. If you don't have anything round, trace a plate on the dough with a pencil, then cut along the line with kitchen shears. For extra precision, dip the edges of your improvised cutter in flour to prevent sticking.
What if my apples are too soft after baking?
Juicy apples can make the filling too wet, leading to a soggy crust. To fix this, drain the filling after mixing and let it sit for 15 minutes before assembling. You can also stir in 1 tablespoon cornstarch to thicken it slightly. For next time, choose firmer apples like Granny Smith or Braeburn, or reduce the lemon juice to ½ tablespoon to prevent excess moisture.
How do I make these pies gluten-free?
Replace the all-purpose flour with a 1:1 gluten-free baking flour blend (like Bob's Red Mill) and add ½ teaspoon xanthan gum if your blend doesn't include it. Chill the dough for 45 minutes longer to help it firm up. For the filling, use 1 extra tablespoon cornstarch to ensure it sets properly. The texture will be slightly different but still delicious—just avoid overbaking to prevent dryness.
Can I use canned apples instead of fresh?
Yes, but you'll need to adjust the recipe slightly. Drain and rinse 2 (15 oz) cans unsweetened apple slices thoroughly, then pat them completely dry with a paper towel. Reduce the brown sugar to ½ cup and add 1 tablespoon lemon juice to brighten the flavor. The texture will be slightly softer, but the spiced filling will still taste amazing—perfect for a quick dessert when fresh apples aren't available.
Why did my crust turn out tough instead of flaky?
Overworking the dough is the most common cause. Keep handling to a minimum—especially when mixing the butter and flour—and avoid overmixing once the water is added. Also, make sure your butter is very cold (not softened) and that you're using ice water. If your kitchen is warm, chill the dough for an extra 15 minutes before rolling. The key is in the pea-sized butter pieces—they should remain visible when you finish mixing.